Real-World Use Case
Professional services firm with project-based teams
A consulting firm has 40 employees across three departments: Strategy, Technology, and Operations. Each department has a Director, Managers, and Consultants. The firm needs consultants to see only their own client engagements, managers to see their team's work, and directors to see everything in their department.
- 1Create a role hierarchy: CEO → Department Directors → Managers → Consultants
- 2Clone the base "Consultant" role for each department (Strategy Consultant, Tech Consultant, Ops Consultant)
- 3Disable peer visibility on the Engagements module so consultants only see their own clients
- 4Enable peer visibility on the Knowledge Base module so everyone can share resources
- 5Use field-level security to hide billing rates from Consultant roles (read-only for Managers, full access for Directors)
- 6Restrict the Import and Export features to Director roles only
Adapt this for your team: This same structure works for any organization: sales teams with territory-based reps, support teams with tiered agents, HR departments with regional managers, or educational institutions with faculty hierarchies. Create roles that mirror your org chart and let the hierarchy handle data visibility automatically.
Key Concepts
Here's what each term means in plain English.
User
A person who can log into your workspace. They have a name, email, and a role that controls what they can do.
Role
A reusable bundle of permissions. Instead of configuring access for each person, you create roles and assign people to them.
Role Hierarchy
Roles are arranged like an org chart. A role higher up can see all data owned by roles below it.
Module Permissions
Controls whether a role can Create, Read, Update, or Delete records in each module (Contacts, Deals, etc.).
Field-Level Security
Fine-grained control over individual fields. Make a field editable, read-only, or completely hidden for a role.
Feature Permissions
Controls access to platform features like Dashboards, Reports, and Import/Export. These are not tied to a specific record.
Peer Visibility
Determines whether users in the same role can see each other's records.
Notification Preferences
Default notification settings for a role. Controls which events trigger in-app or email alerts.
Users Page
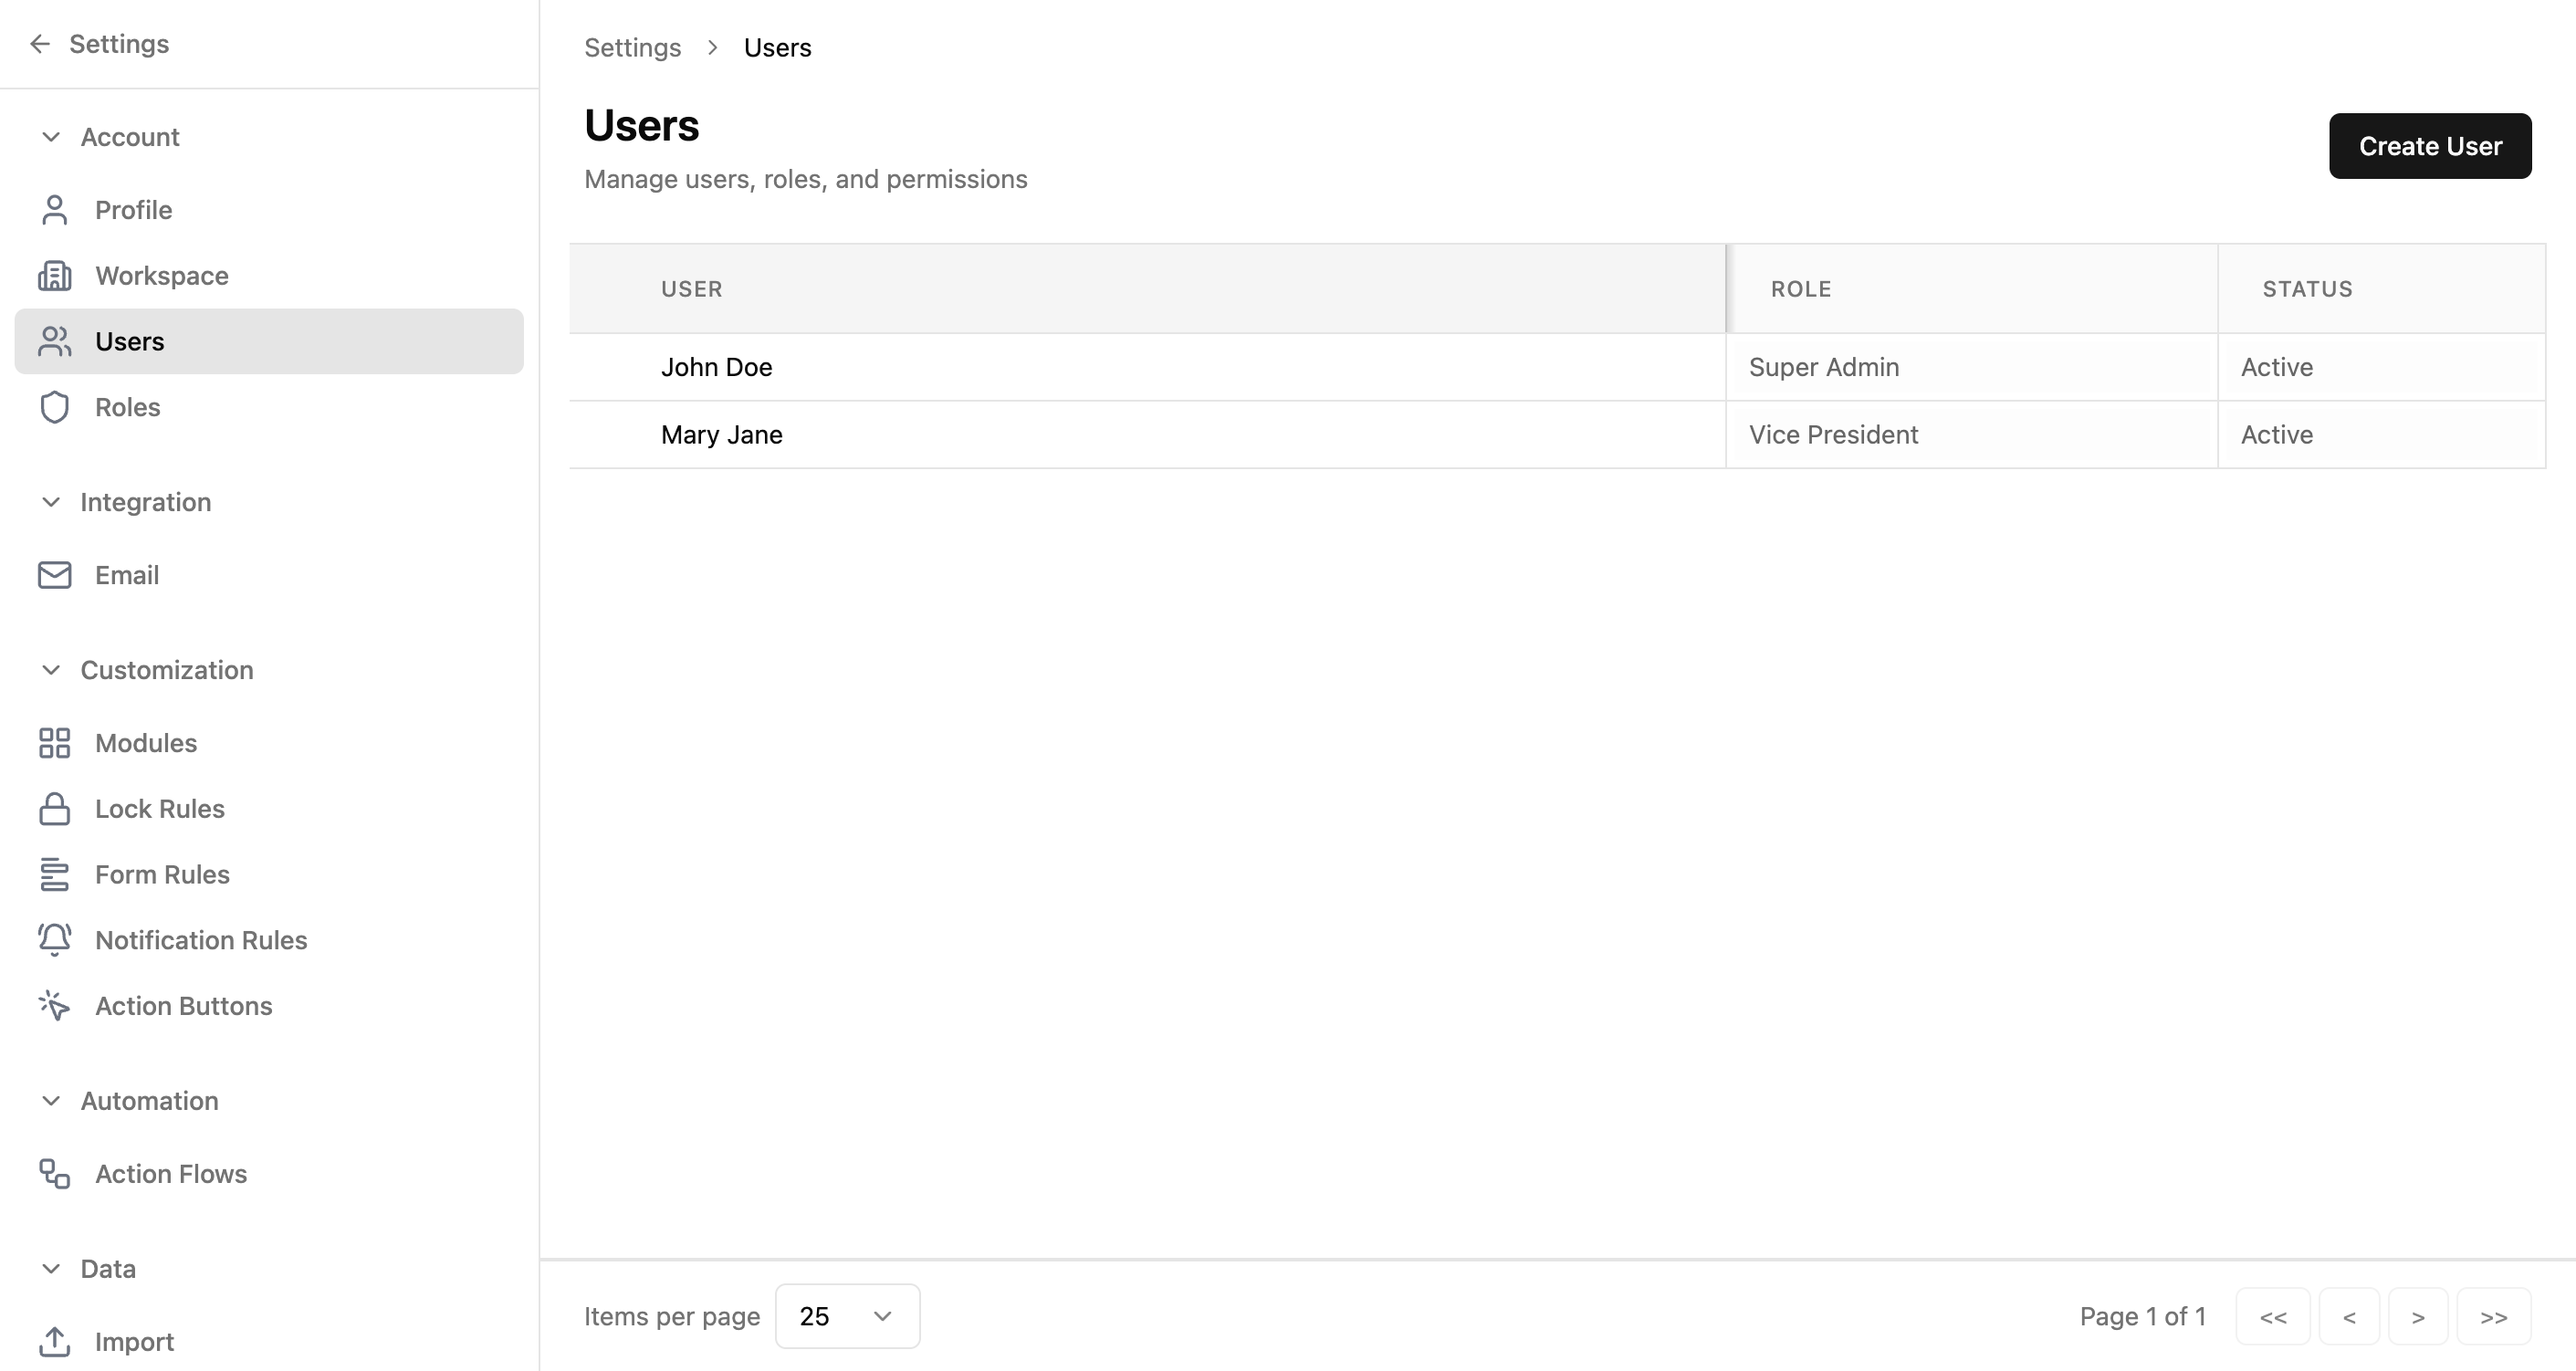
This page shows everyone who has access to your workspace. A simple table where you can see at a glance who's on your team, what role they have, and whether their account is active.
What Each Column Means
| Column | Description |
|---|---|
| Name | The user's full name. Click it to view their profile and edit details. |
| Role | The role assigned to this user (determines their permissions). |
| Status | Active = can log in. Inactive = access revoked. |
Available Actions
| Action | How |
|---|---|
| Add a new user | Click the "Create User" button (top right) |
| View/edit a user | Click on their name in the table |
| Sort the list | Click any column header |
| Change page size | Use the "Items per page" dropdown at the bottom |
Creating a User
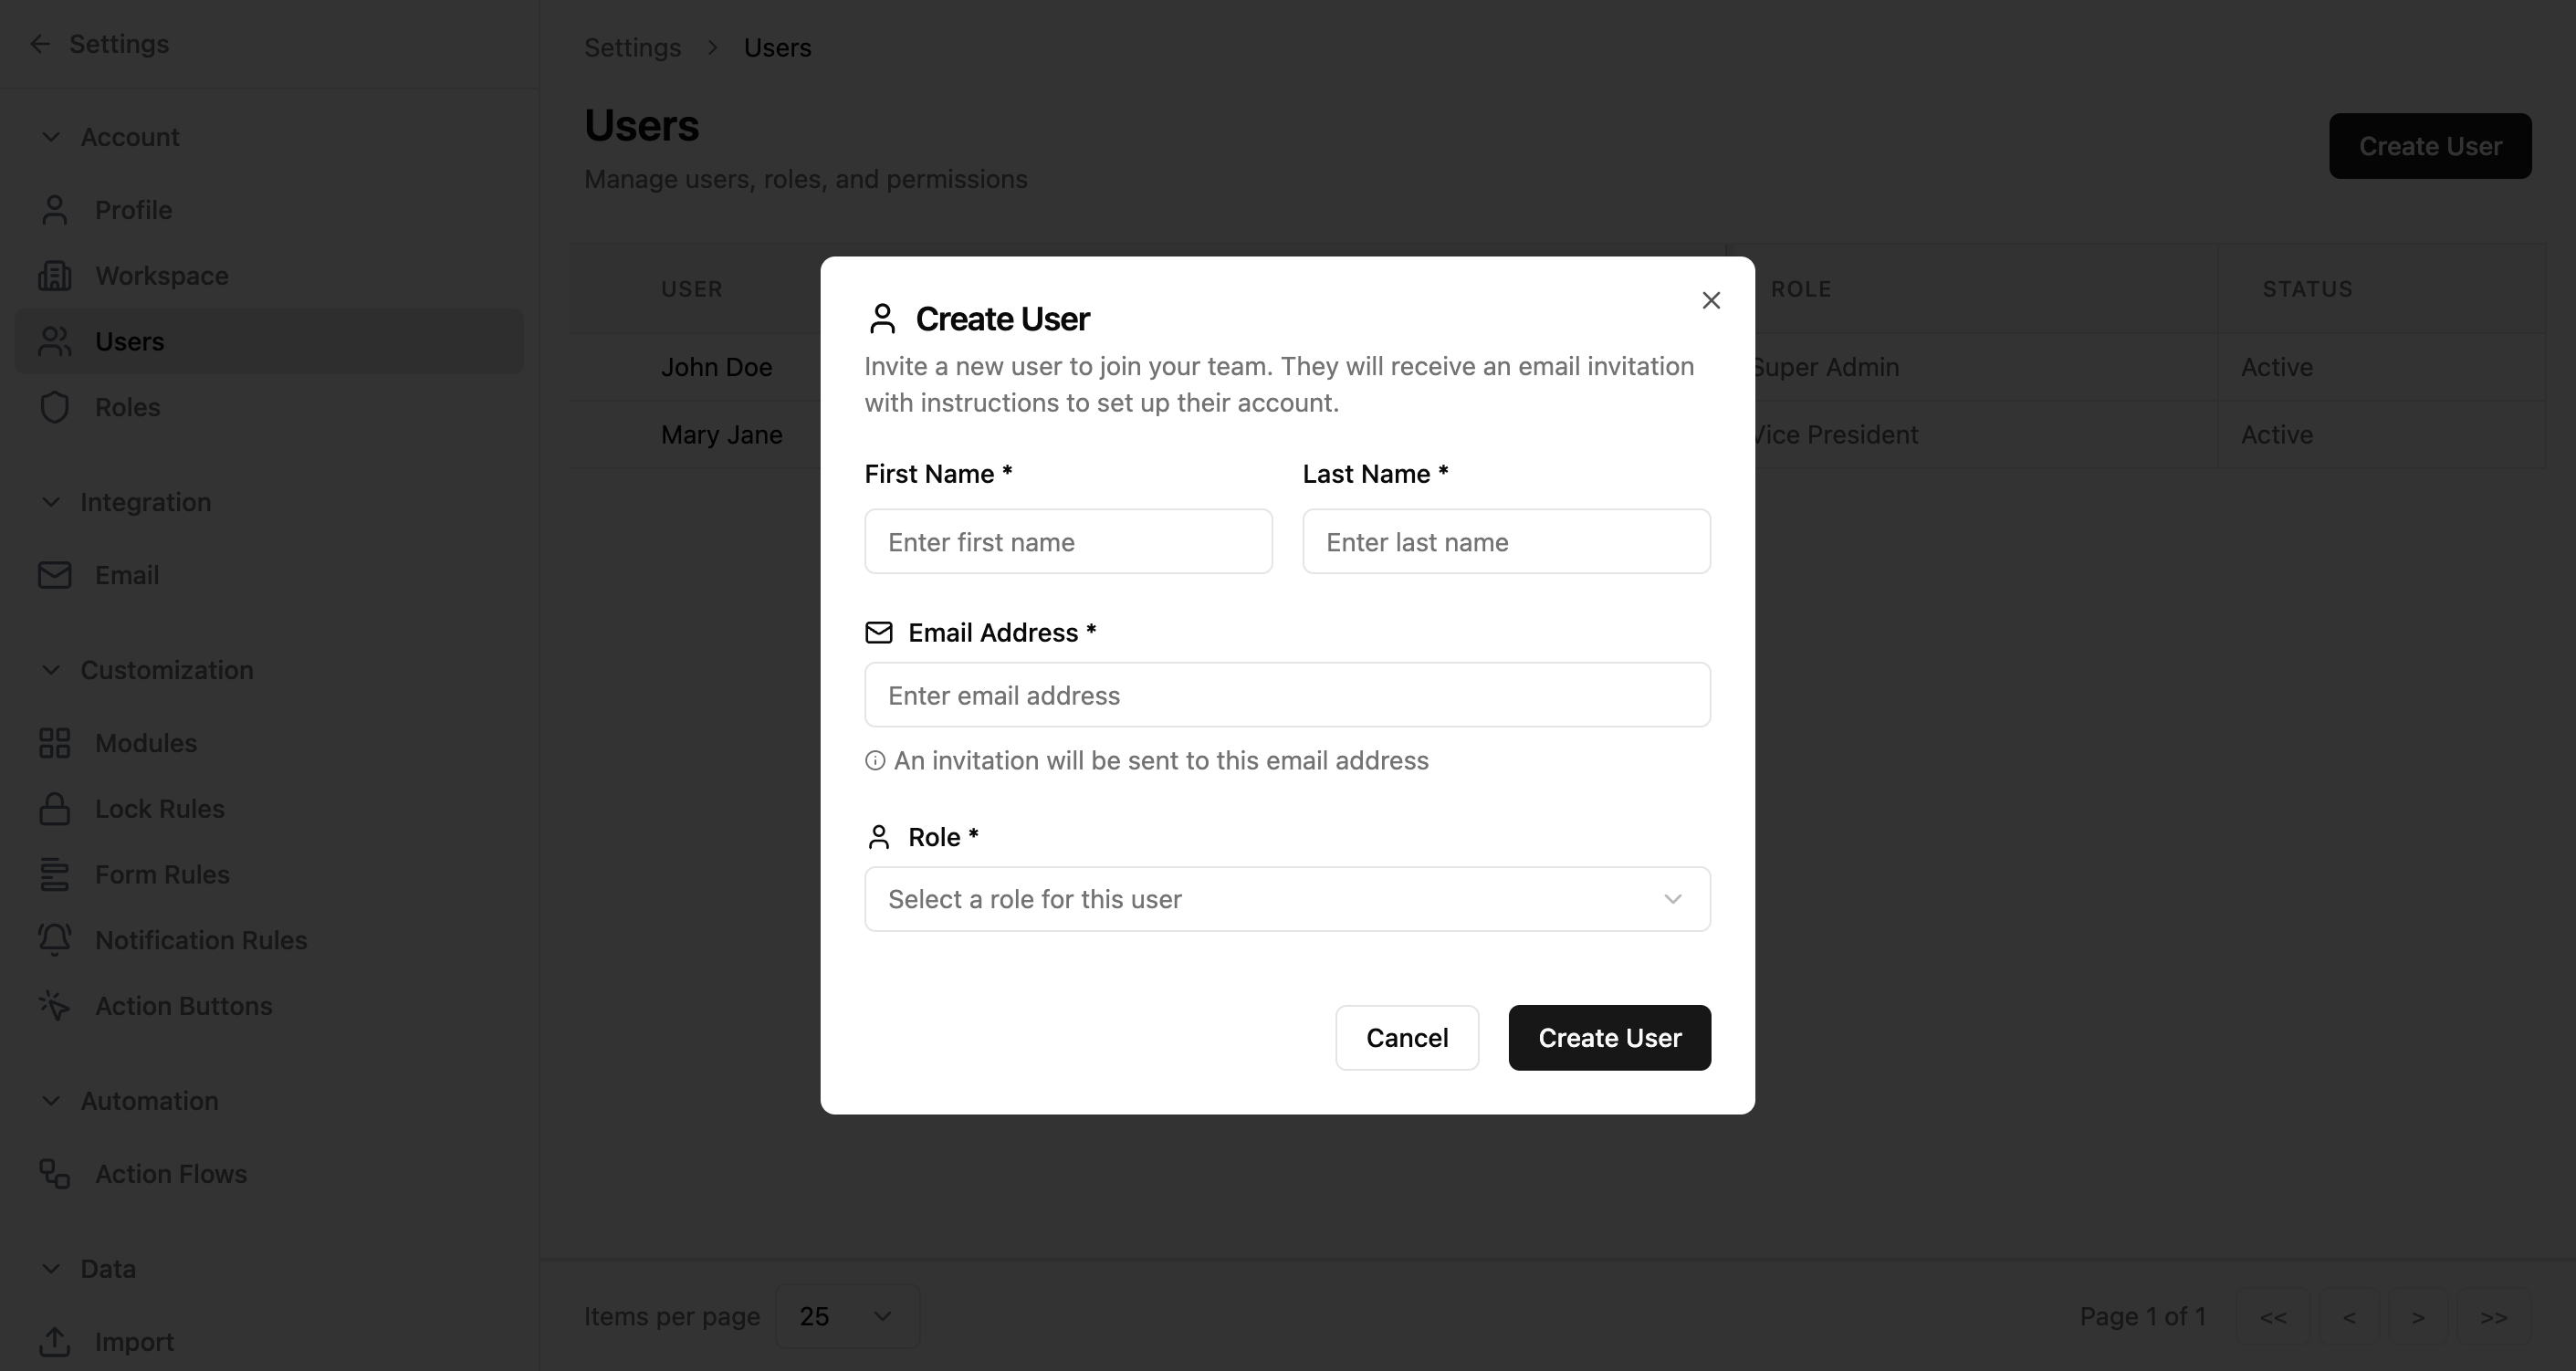
Click "Create User" to open a dialog where you enter the new person's details. They'll receive an email invitation to set up their account.
Form Fields
| Field | Required | Description |
|---|---|---|
| First Name | <span class="help-badge help-badge-required">Required</span> | The person's first name |
| Last Name | <span class="help-badge help-badge-required">Required</span> | The person's last name |
| Email Address | <span class="help-badge help-badge-required">Required</span> | Where the invitation will be sent. Becomes their login email. |
| Role | <span class="help-badge help-badge-required">Required</span> | Which role to assign. This determines what they can access. |
How It Works
- 1Fill in the person's first and last name
- 2Enter their email address
- 3Select a role from the dropdown
- 4Click "Create User"
- 5They receive an email invitation to set up their password
- 6Once they accept, they appear as "Active" in the users list
️ Tip: Submit with missing fields and validation errors appear below each one. "Create User" stays disabled until all fields are valid.
User Detail Page
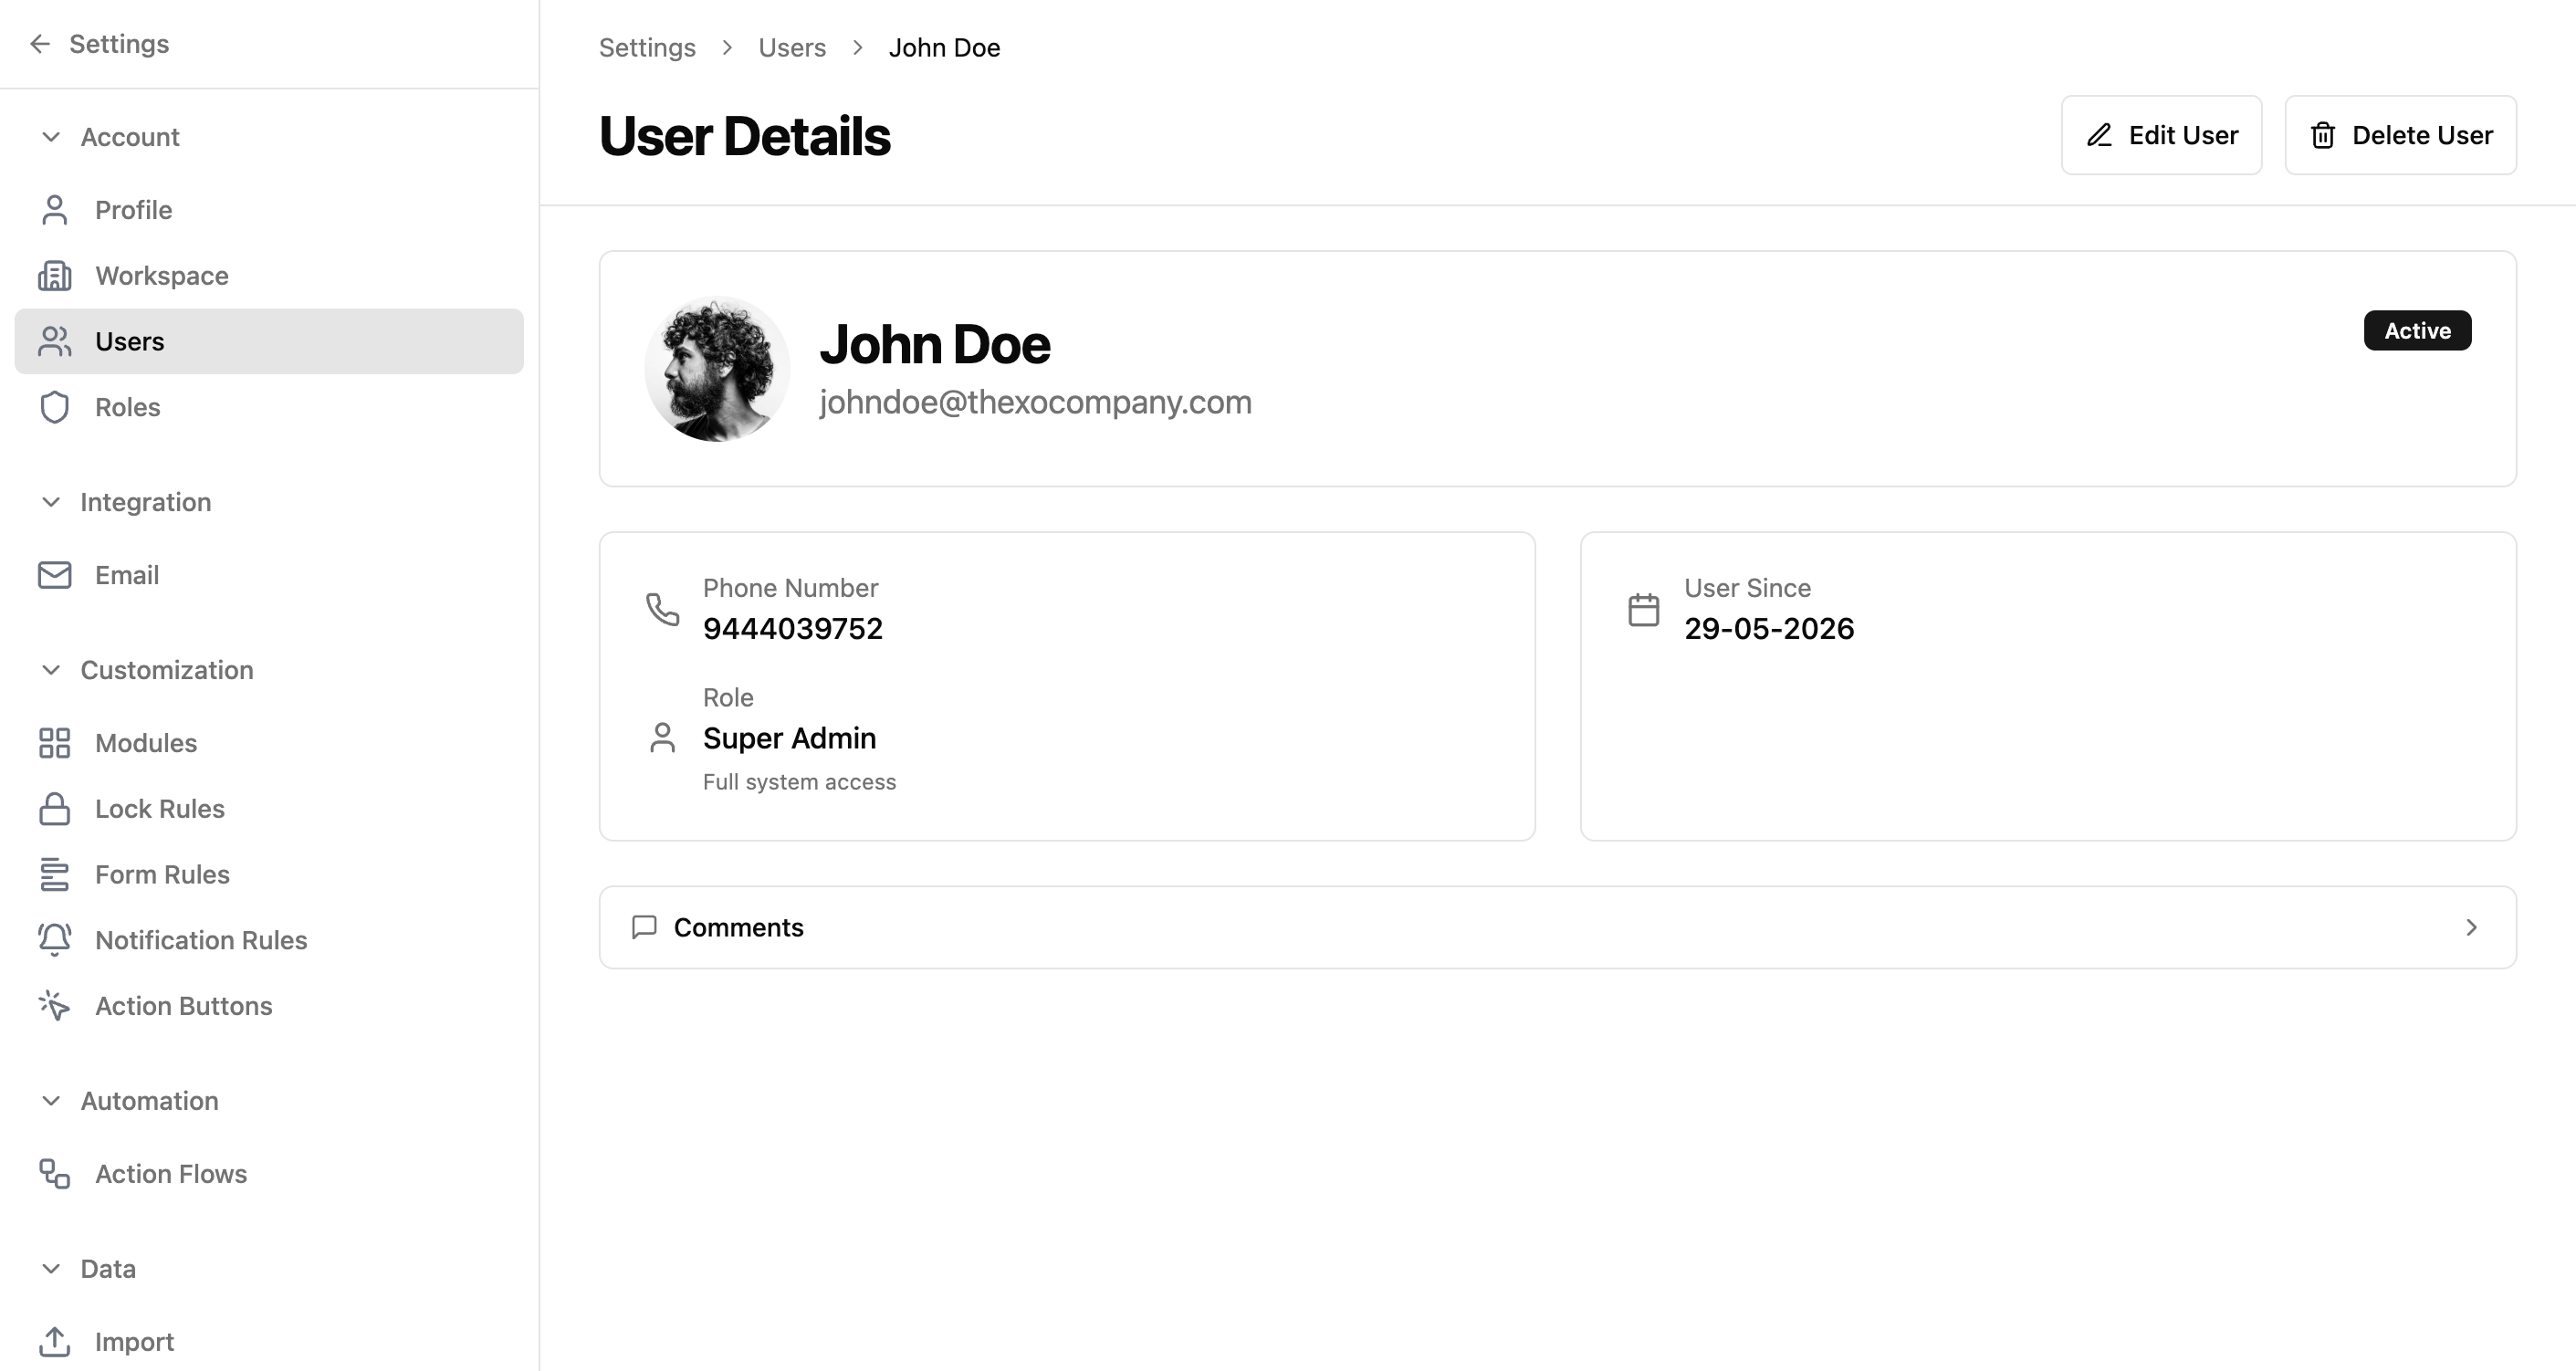
Click any user's name to see their full profile. This page shows all their information and gives you options to edit or remove them.
Information Displayed
| Field | Description |
|---|---|
| Avatar | Initials-based avatar (e.g., "SE" for Samson Eductional) |
| Full Name | Displayed prominently as a heading |
| Their login email address | |
| Status | Green "Active" badge or "Inactive" indicator |
| Phone Number | Contact phone number |
| Role | Assigned role name with a brief description |
| User Since | The date they joined the workspace |
Action Buttons
| Button | What It Does |
|---|---|
| Edit User | Opens an inline edit form to change name or role |
| Delete User | Removes the user from the workspace (asks for confirmation) |
Editing a User
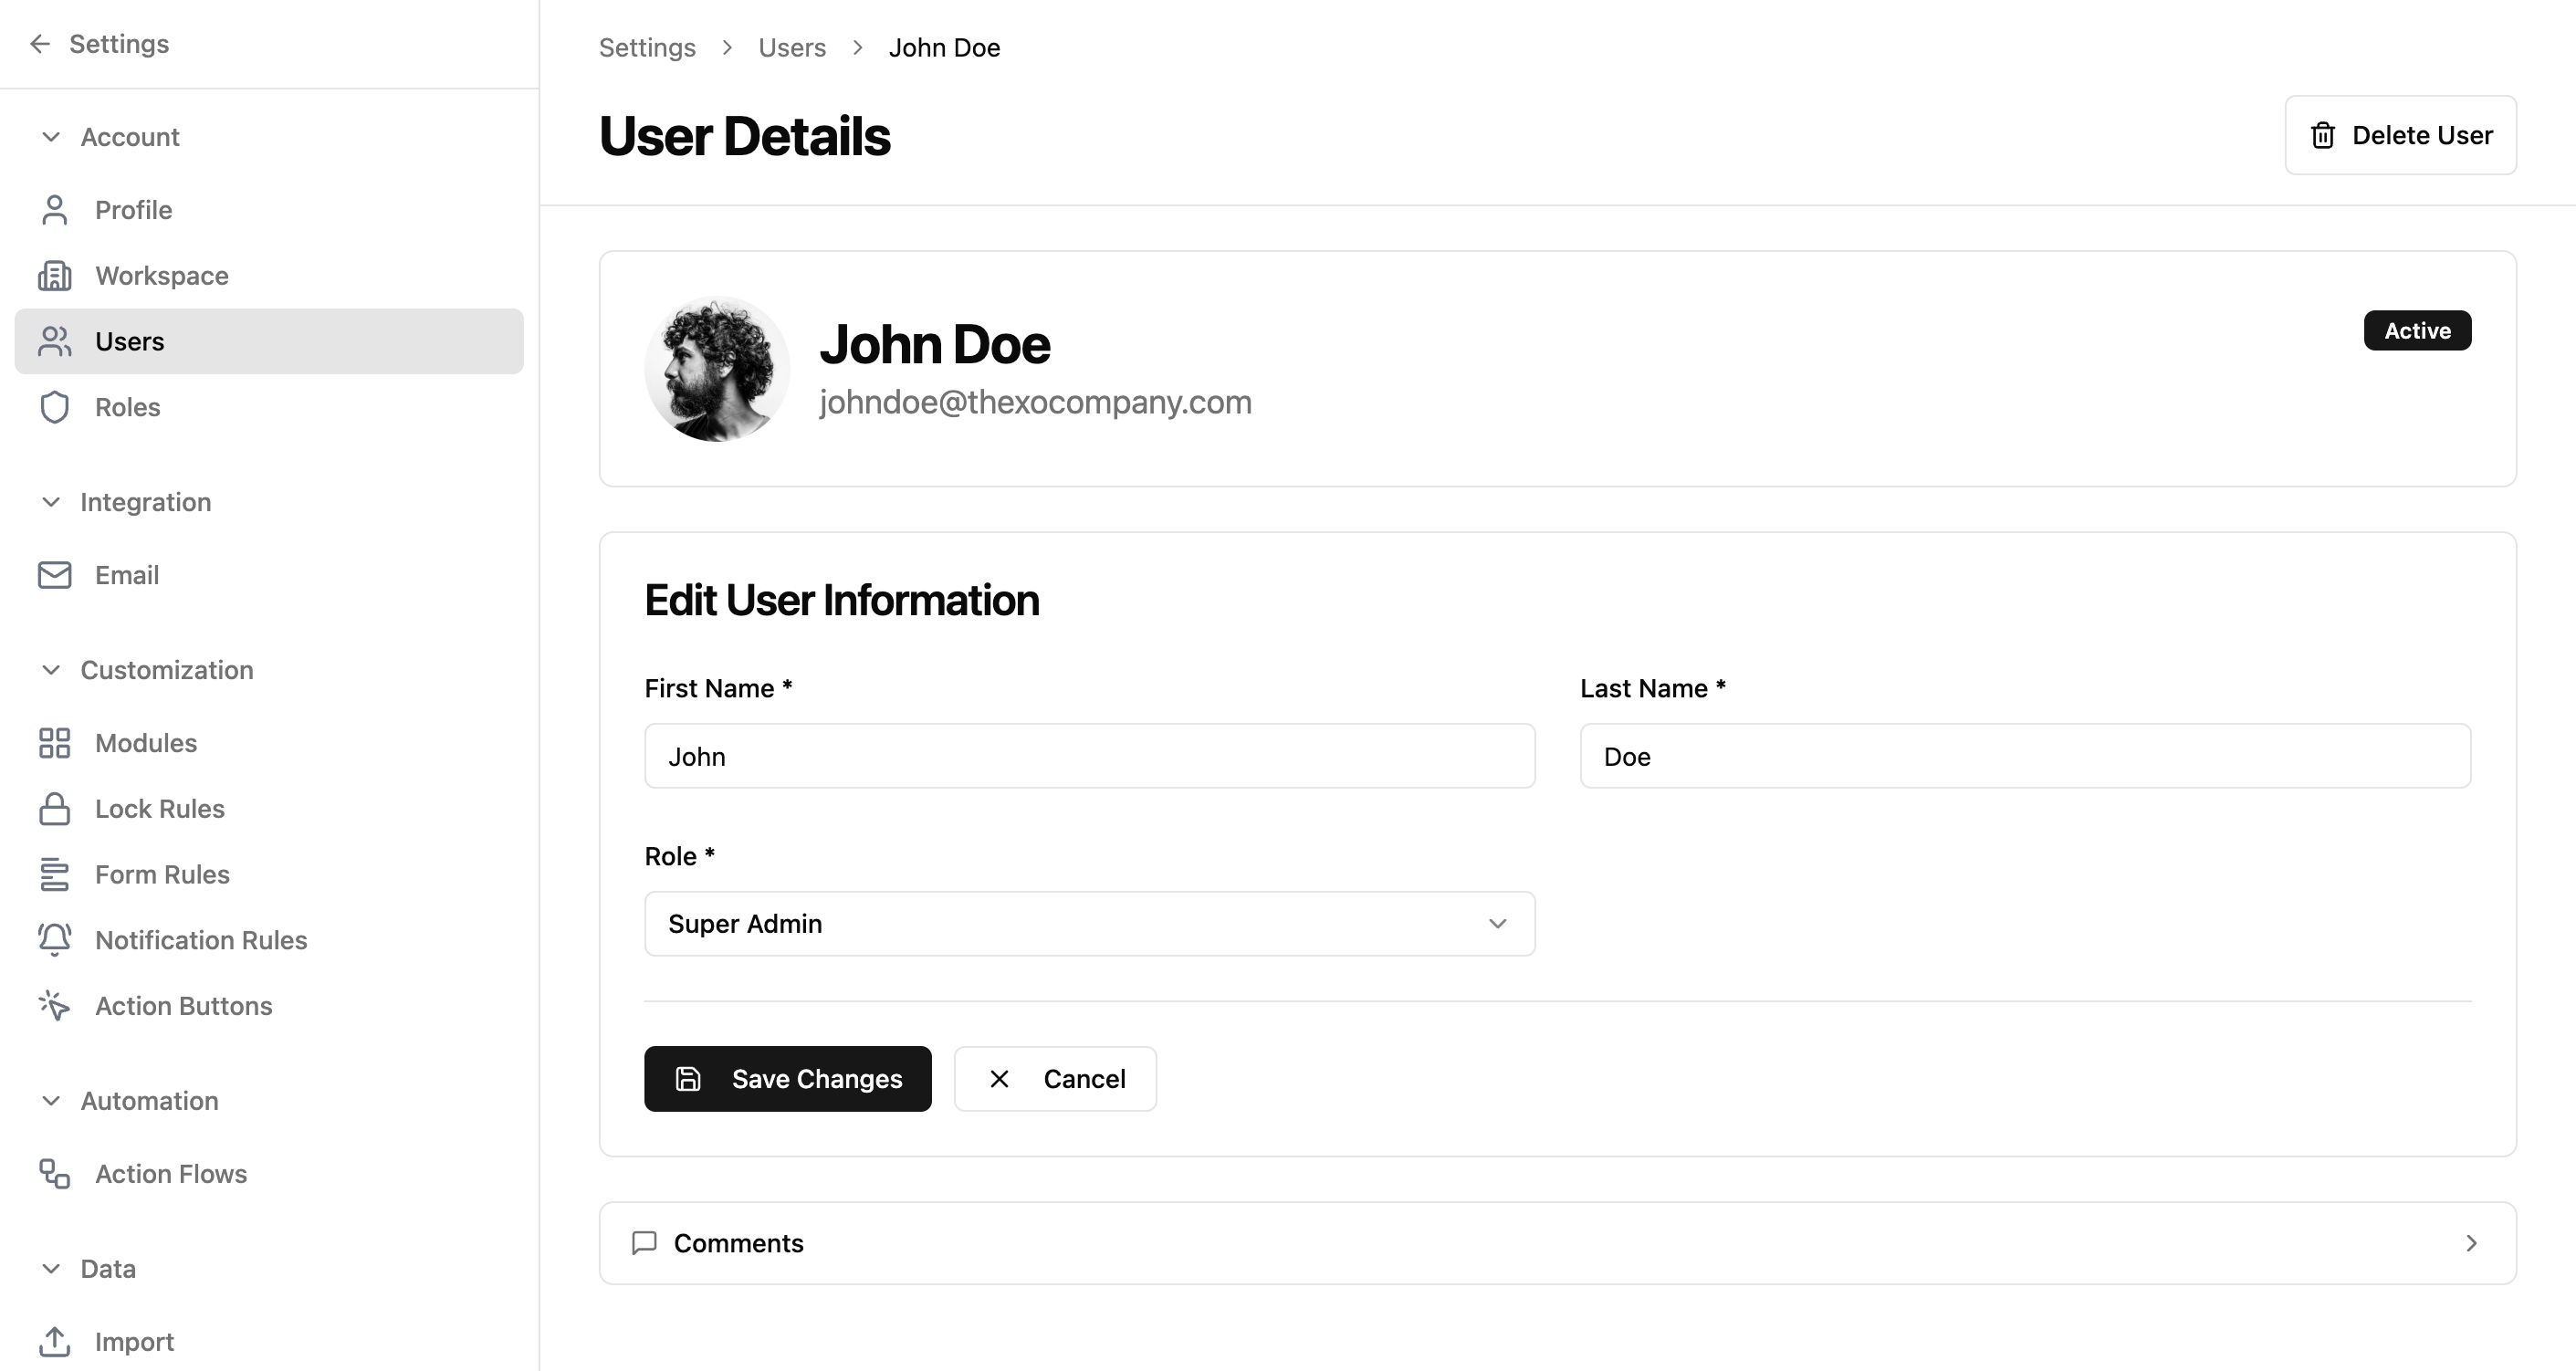
Click "Edit User" on the detail page and the profile card transforms into an editable form.
Editable Fields
| Field | Editable? | Notes |
|---|---|---|
| First Name | Yes | Update the user's first name |
| Last Name | Yes | Update the user's last name |
| Role | Yes | Reassign to a different role via dropdown |
| No | Cannot be changed from settings |
️ Note: Changing a user's role immediately changes what they can access. Make sure the new role has appropriate permissions before reassigning.
Click "Save Changes" to apply your edits, or "Cancel" to discard them.
Roles Page
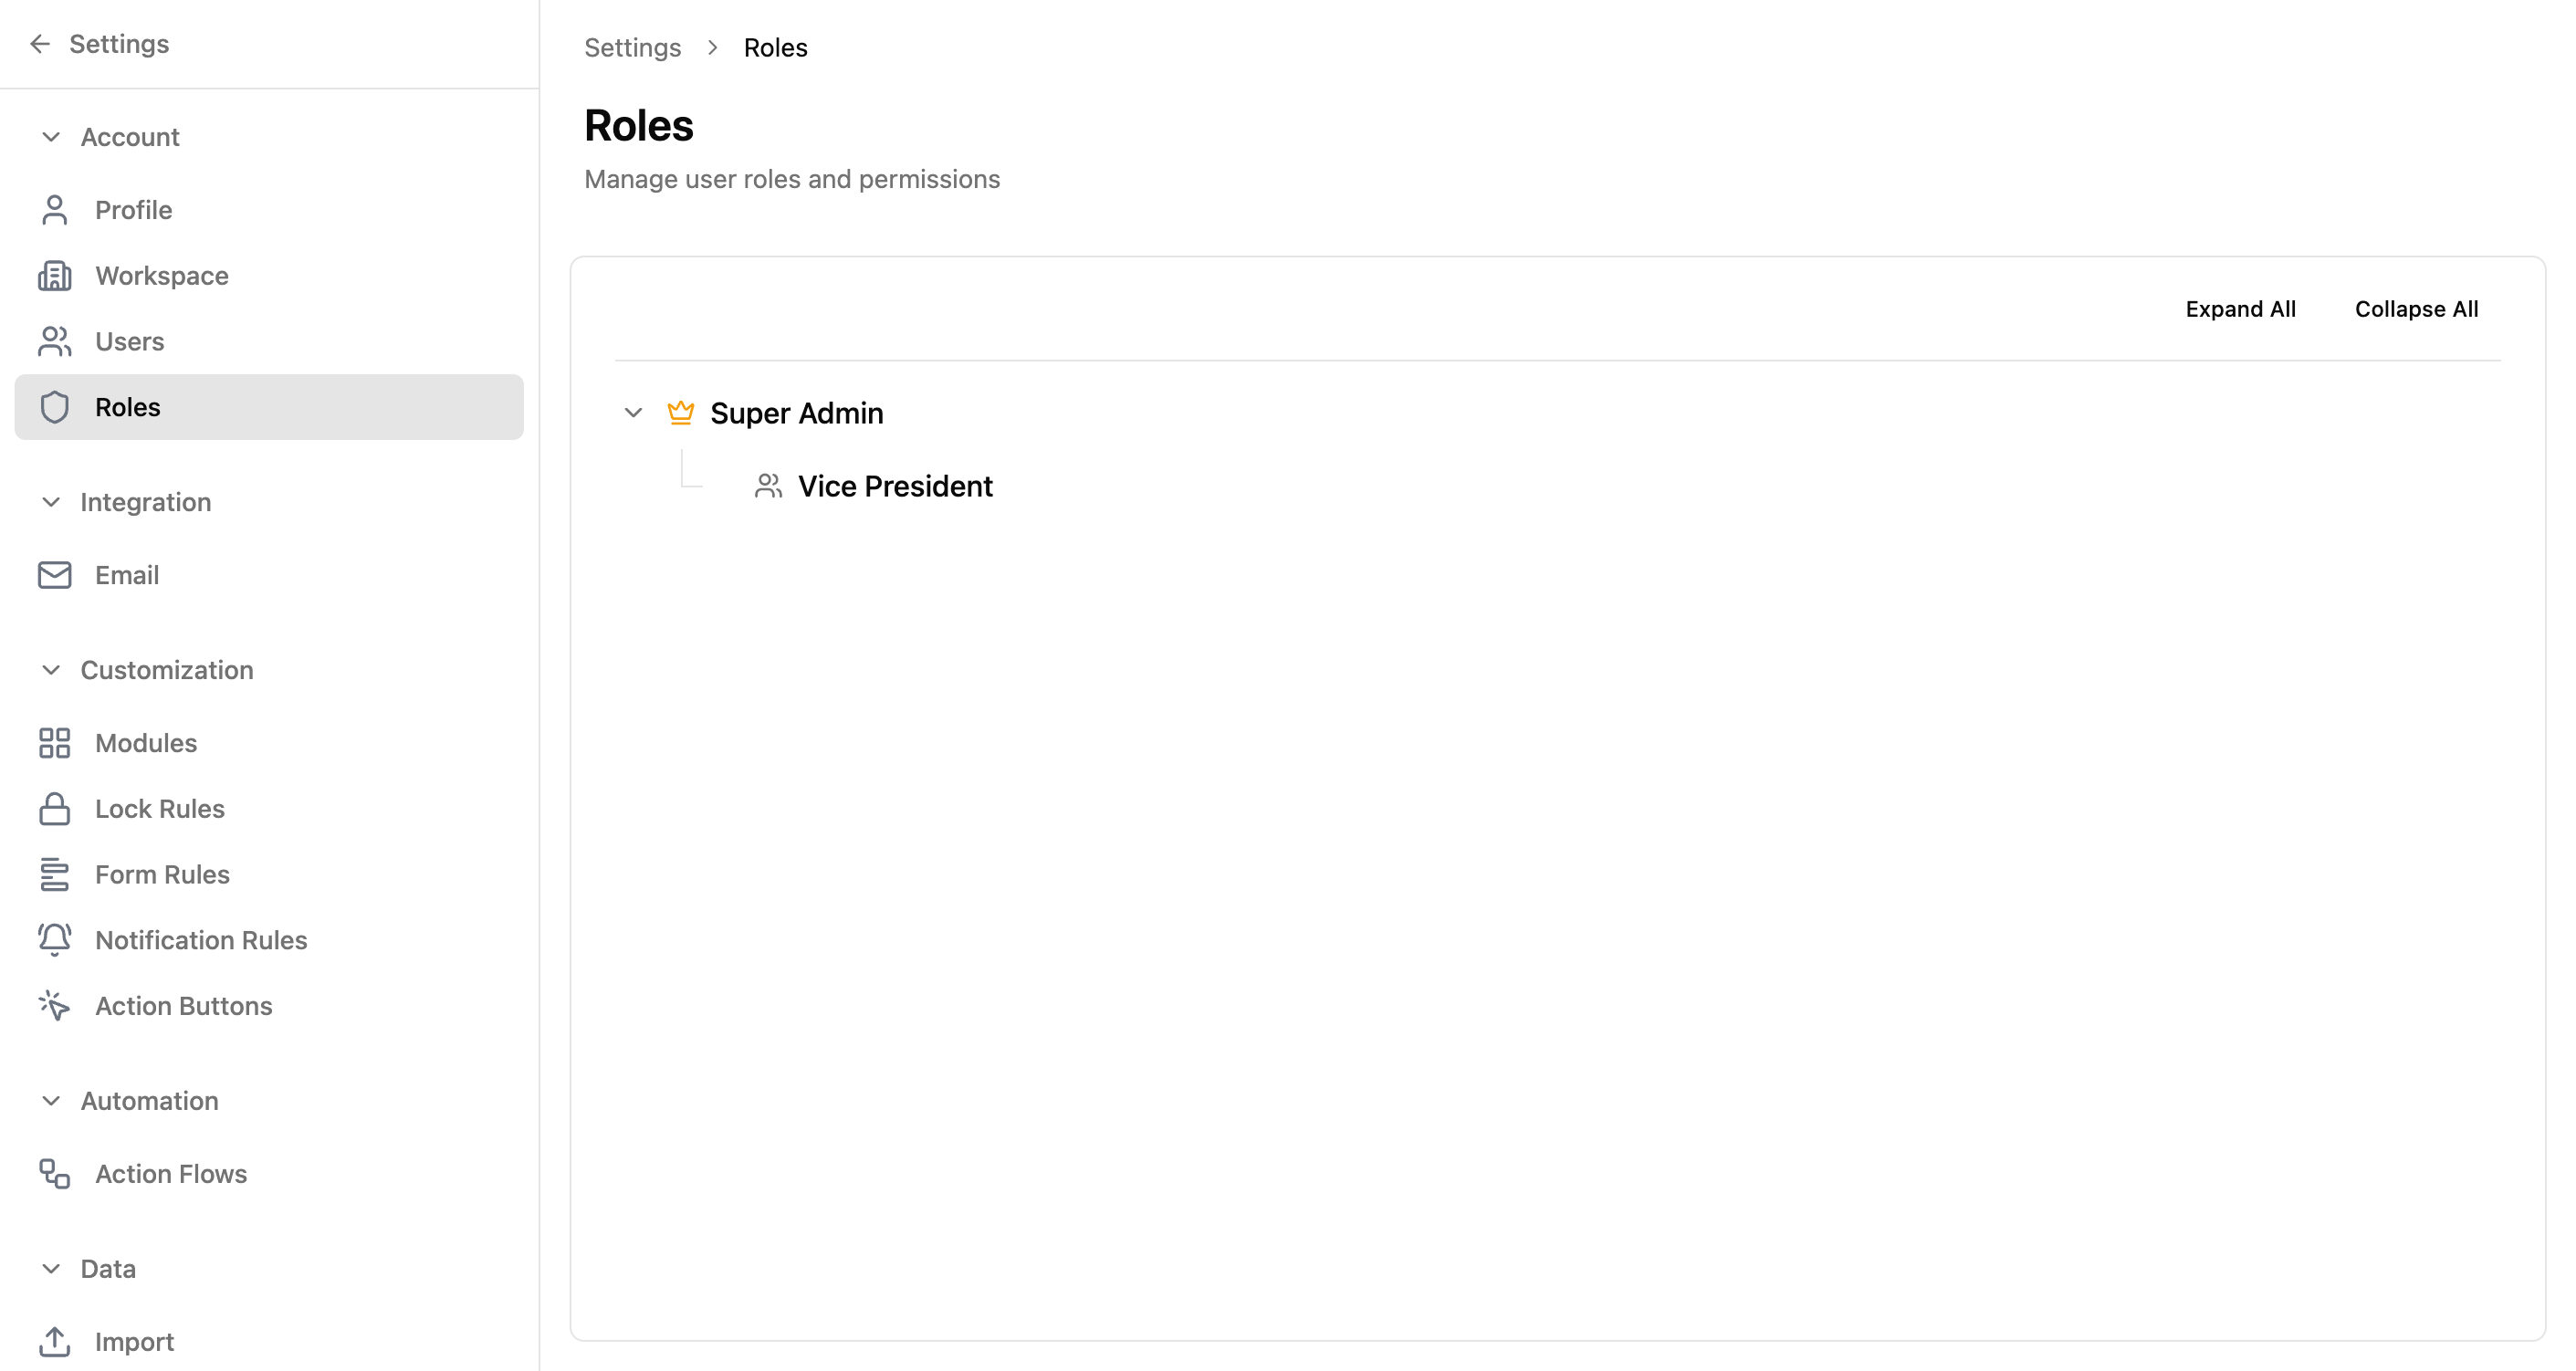
This page displays all roles as a hierarchy tree, showing parent-child relationships (who reports to whom).
What You See in the Tree
| Element | Meaning |
|---|---|
| Crown icon | Super Admin (top-level role with full access) |
| People icon | Regular role |
| Role name | The display name of the role |
| "X members" badge | How many users are assigned to this role |
| "Inactive" badge | Role has been deactivated |
| "System" badge | Built-in role that cannot be deleted |
| Expand/collapse arrows | Show or hide child roles |
Tree Controls
| Button | What It Does |
|---|---|
| Expand All | Opens all branches to show every role |
| Collapse All | Closes all branches, showing only top-level roles |
Adding a Role from the Tree
Hover over any role in the tree to reveal an "Add role" button. Clicking it opens the Create Role dialog with that role pre-selected as the parent.
Creating a Role
New roles are created by cloning an existing role's permissions and placing the new role in the hierarchy.
Form Fields
| Field | Required | Description |
|---|---|---|
| Role Name | <span class="help-badge help-badge-required">Required</span> | A unique name (min 2 characters). Cannot duplicate an existing name. |
| Description | <span class="help-badge help-badge-optional">Optional</span> | Brief description of what this role is for (max 100 characters). |
| Clone From | <span class="help-badge help-badge-required">Required</span> | An existing role to copy permissions from as a starting point. |
| Reports To | <span class="help-badge help-badge-required">Required</span> | The parent role in the hierarchy. Determines data visibility. |
Understanding "Reports To"
The hierarchy determines who can see whose data. A parent role can see all records owned by child roles below it.
`` Sales Director (sees all sales data) ├── Sales Manager (sees their team's data) │ ├── Sales Rep A (sees only their own data) │ └── Sales Rep B (sees only their own data) └── Account Manager (sees only their own data) ``
Understanding "Clone From"
Instead of building permissions from scratch, you pick an existing role to copy. After creation, you can customize the new role's permissions independently. Changes won't affect the source role.
Steps
- 1Hover over a role in the tree and click "Add role"
- 2Enter a unique role name
- 3Optionally add a description
- 4Select which existing role to clone permissions from
- 5Confirm the parent role (Reports To)
- 6Click Create
- 7The new role appears in the tree under its parent
Role Detail Page
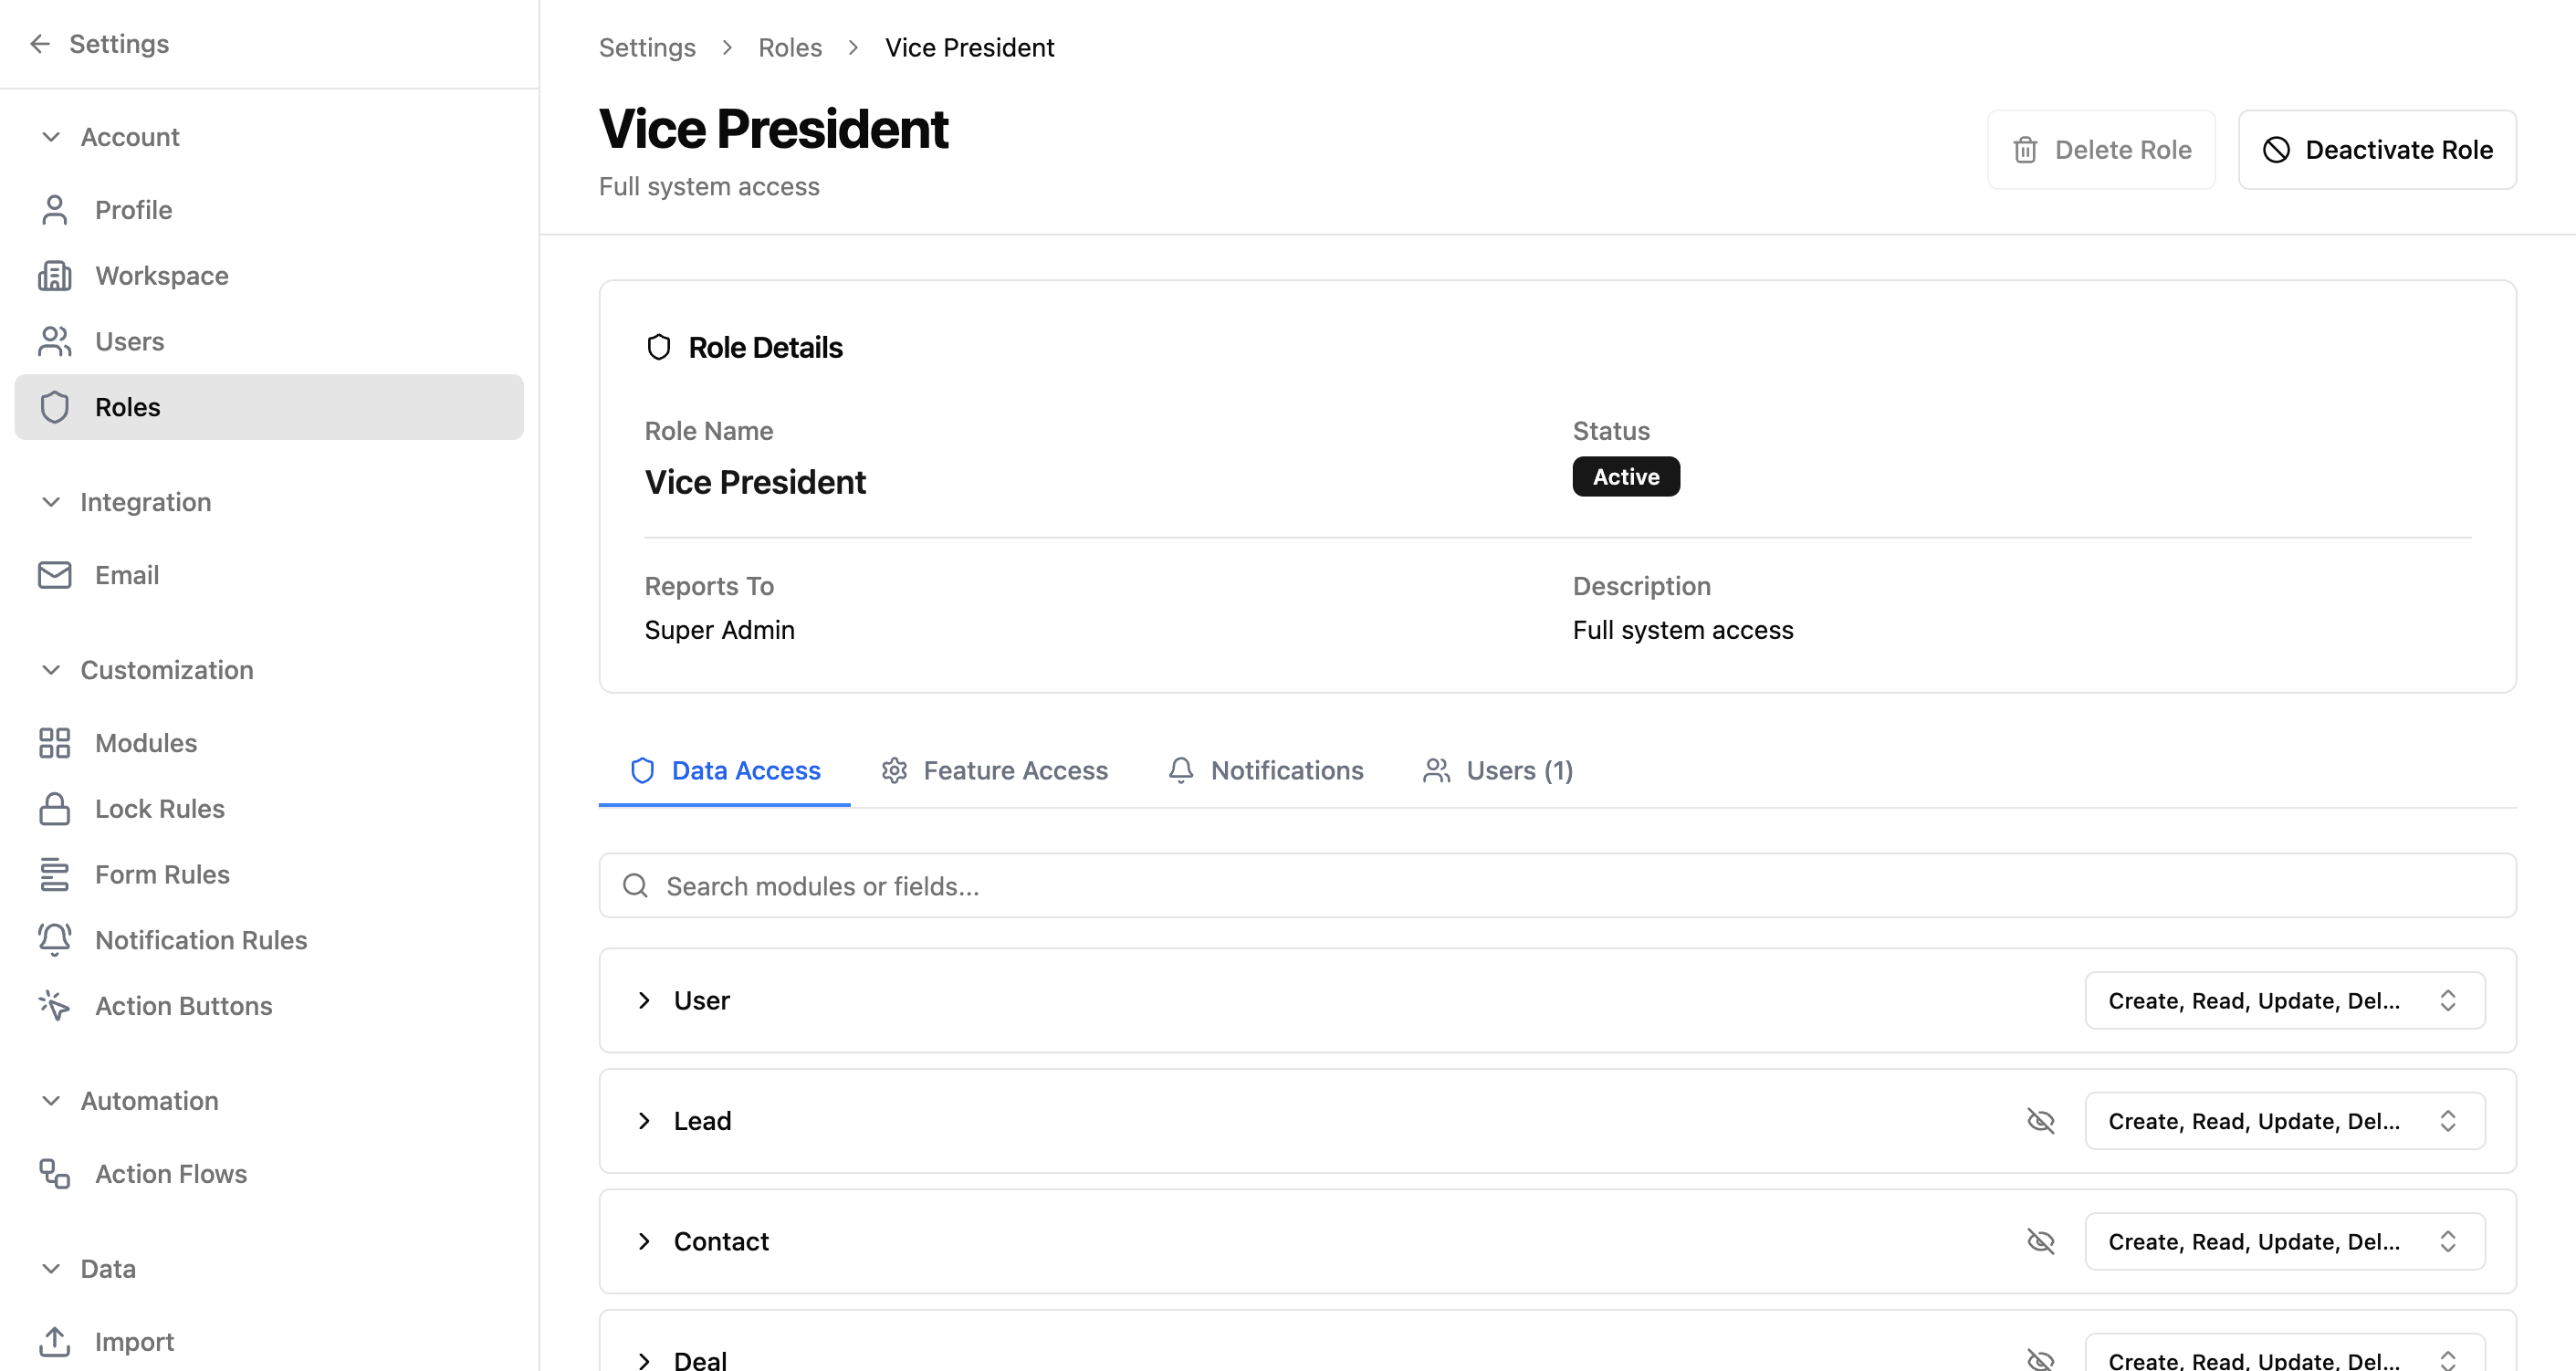
Click any role in the hierarchy tree to open its detail page. This is where you configure everything about what users in this role can do.
Role Details Card
| Field | Description |
|---|---|
| Role Name | The display name of this role |
| Status | Active or Inactive |
| Description | What this role is for |
Tabs
| Tab | What It Contains |
|---|---|
| Data Access | Module permissions (CRUD), Field-level security, Peer visibility |
| Notifications | Default notification preferences for this role |
| Users (count) | List of members assigned to this role |
️ Note: The Super Admin role has full access to everything. Its permissions are displayed but cannot be modified.
Module Permissions
Found in the Data Access tab. A table showing each module with checkboxes for the four CRUD operations.
Permission Types
| Permission | What It Allows | Example |
|---|---|---|
| Create | Add new records to this module | Create a new Contact |
| Read | View existing records | See the Contacts list and open records |
| Update | Edit/modify existing records | Change a Contact's phone number |
| Delete | Remove records permanently | Delete a Contact from the system |
How It Works
- Checked = permission granted
- Unchecked = permission denied
- Row checkbox = select/deselect all four permissions for that module at once
- Search box = filter modules by name
️ In practice: If a role doesn't have "Read" for Deals, the Deals module won't appear in their sidebar. If they don't have "Create", the "New Record" button won't show.
Field-Level Security
A more granular layer below module permissions. Even if a role can access a module, you can hide or lock specific fields within it.
Access Levels
| Level | What It Means | Use Case |
|---|---|---|
| Read & Write | User can see and edit this field | Standard fields everyone works with |
| Read Only | User can see but not change this field | Sensitive data like revenue that only managers edit |
| Don't Show | Field is completely hidden | Internal fields certain roles shouldn't see |
How It's Organized
- Fields are grouped by module in collapsible sections
- Each section header shows: module name, total field count, and a summary (e.g., "5 editable, 2 read-only, 1 hidden")
- Expand a section to see a table with radio buttons for each access level
- Use the search box to filter fields by name across all modules
Feature Permissions
Controls access to platform features not tied to specific records. Only visible to Super Admins when managing other roles.
Feature Groups
| Group | Features It May Include |
|---|---|
| Dashboard | View dashboards, create/edit reports, manage widgets |
| Settings | Access settings pages, manage modules, configure rules |
| Data | Import records, export data, bulk operations |
| Automation | Create workflows, manage action flows |
| Customization | Module builder, form rules, action buttons |
How to Edit
Click the dropdown for a feature group to see all available features. Check or uncheck individual features. Groups with unsaved changes show an amber "Modified" label.
️ Important: Feature permissions are saved separately from module permissions. Make sure to save changes before switching tabs.
Peer Visibility
This setting answers one question: "Can users in the same role see each other's records?"
How It Works
| Setting | Behavior |
|---|---|
| Enabled | Users in this role can see records owned by other users who also have this role |
| Disabled | Users can only see their own records (plus records from roles below them in the hierarchy) |
When to Use
Enable Peer Visibility
For shared resources like Accounts where the whole team needs visibility, or support tickets any agent might handle.
Disable Peer Visibility
For personal pipelines like Deals where each rep's opportunities are private, or individual performance data.
Peer visibility is configured per module. You might enable it for Accounts (shared) but disable it for Deals (personal).
️ Remember: The role hierarchy always applies on top of peer visibility. A manager role above in the hierarchy can always see records from roles below, regardless of this setting.
Notification Preferences
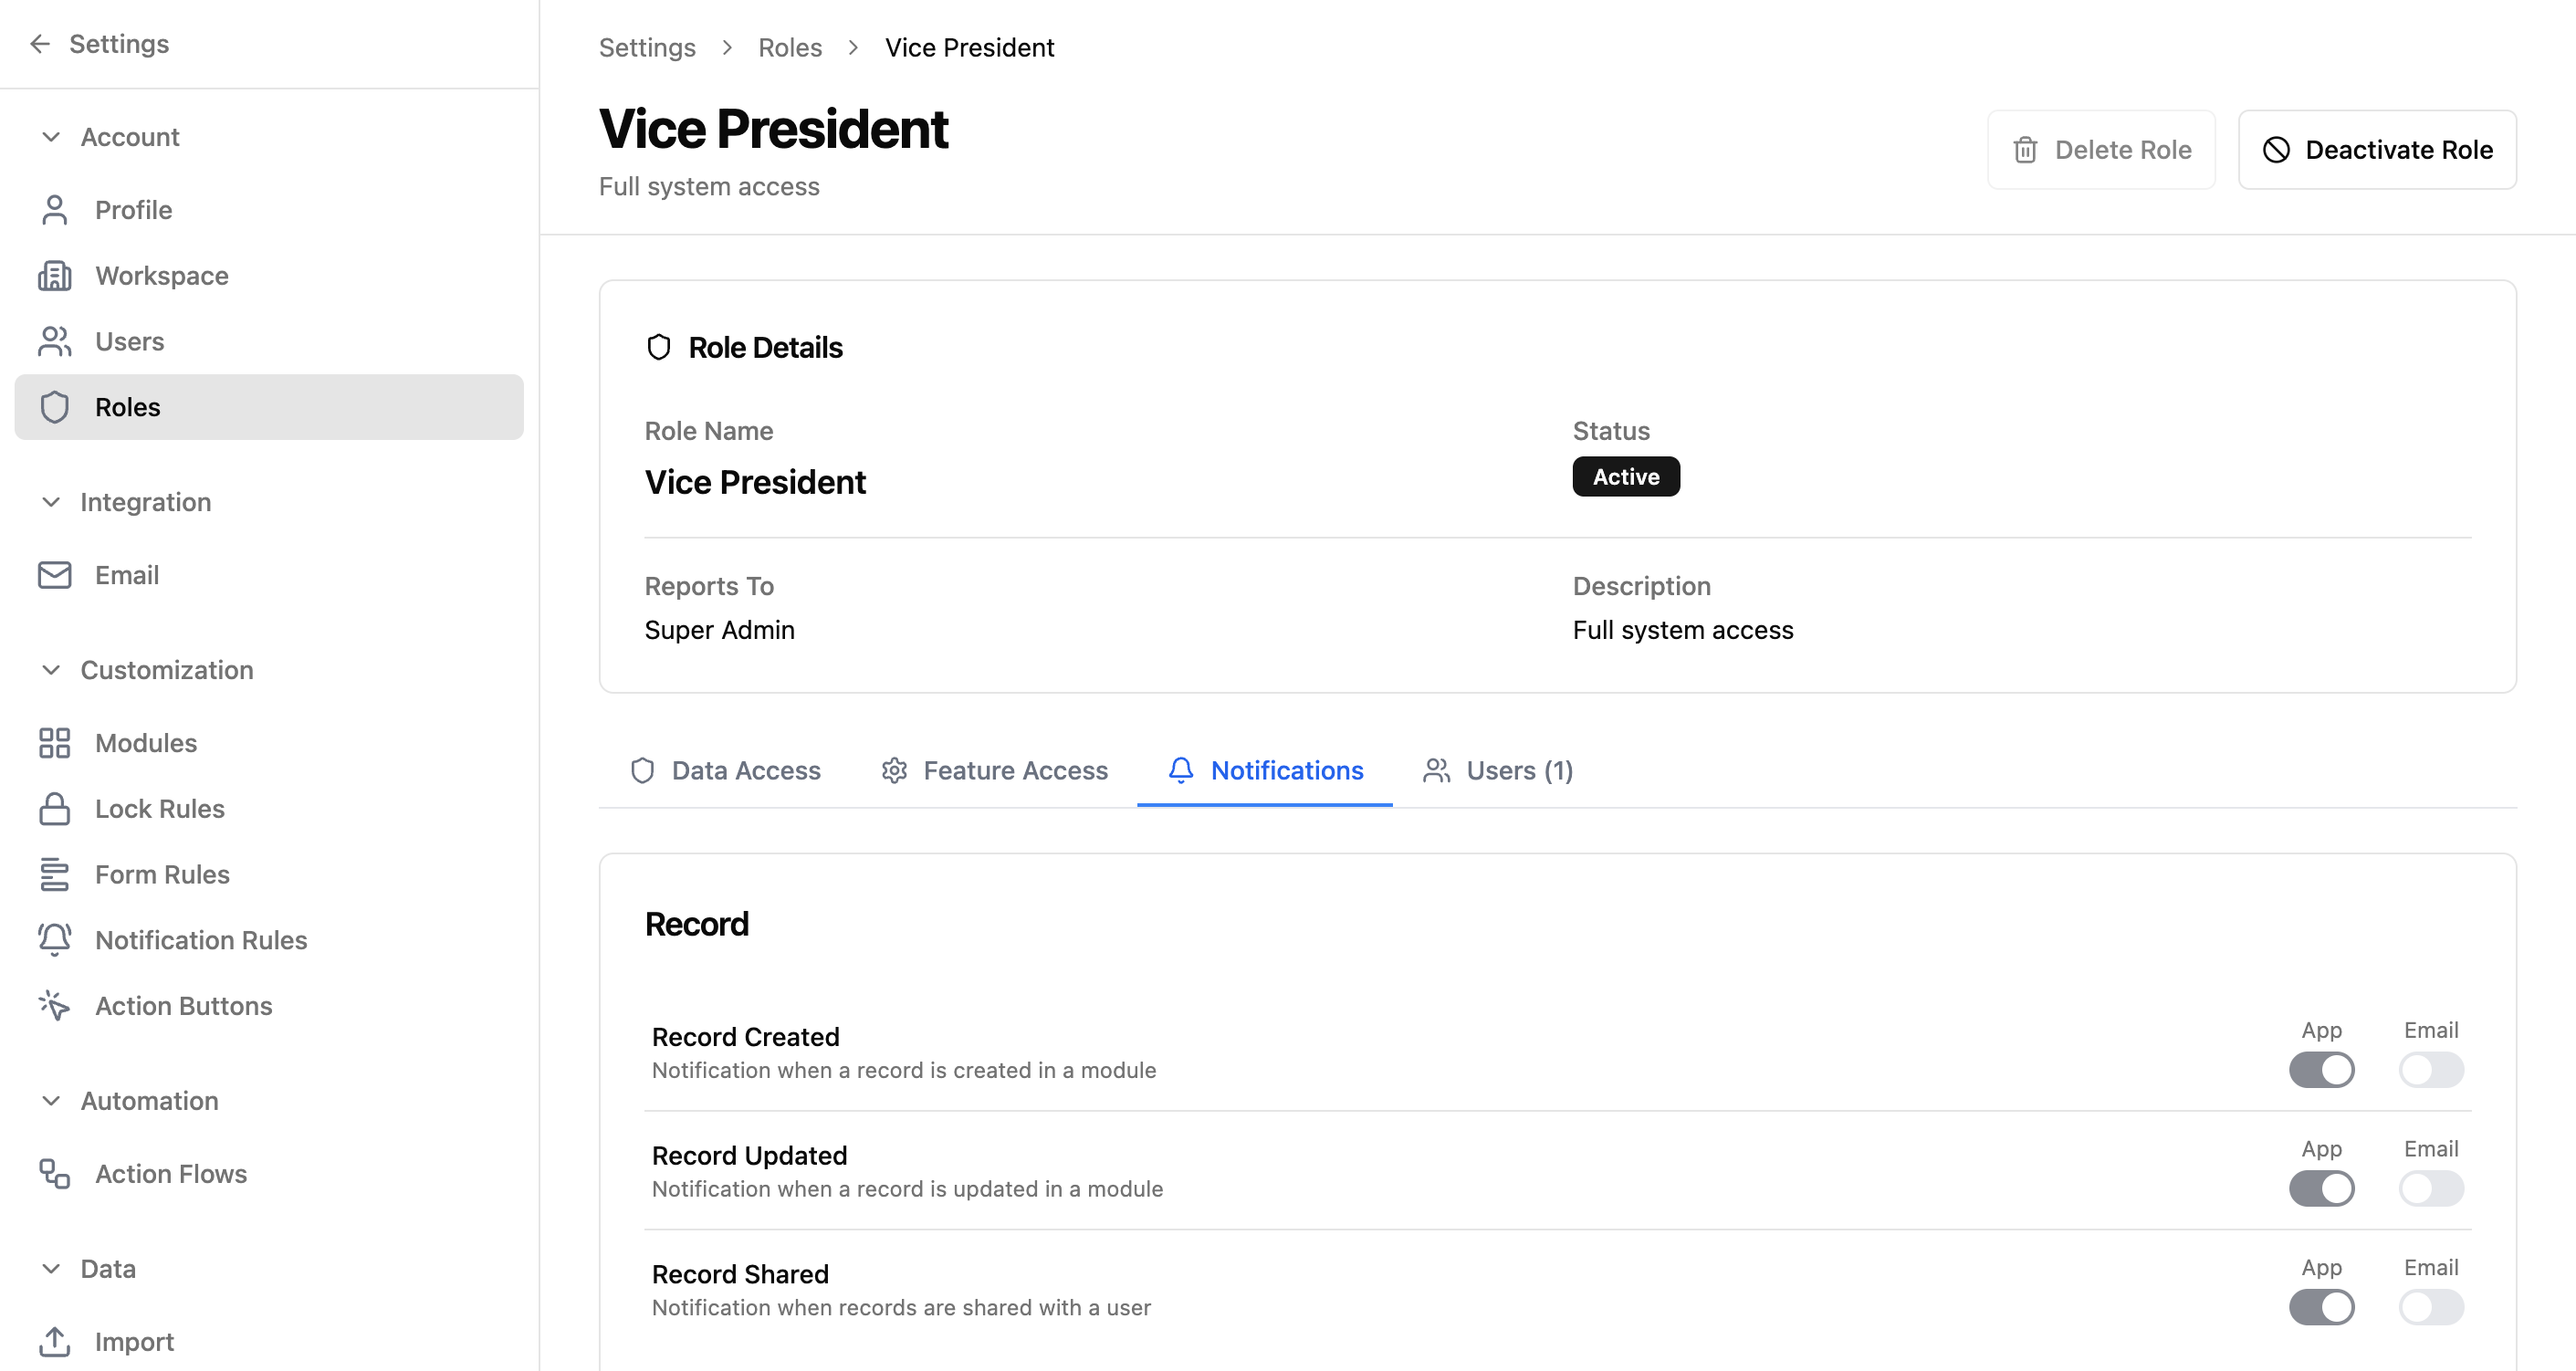
The Notifications tab sets default notification preferences for all users in this role.
Notification Channels
| Channel | How It Works |
|---|---|
| App (In-App) | Shows as a notification in the bell icon panel within the application |
| Sends an email to the user's registered email address |
Notification Types
| Type | When It Fires |
|---|---|
| Record Created | A new record is created in a module the user has access to |
| Record Updated | An existing record is modified |
| Record Shared | Records are explicitly shared with the user |
Each notification type has independent toggles for App and Email. Toggle them on or off based on what's useful for this role.
Role Members
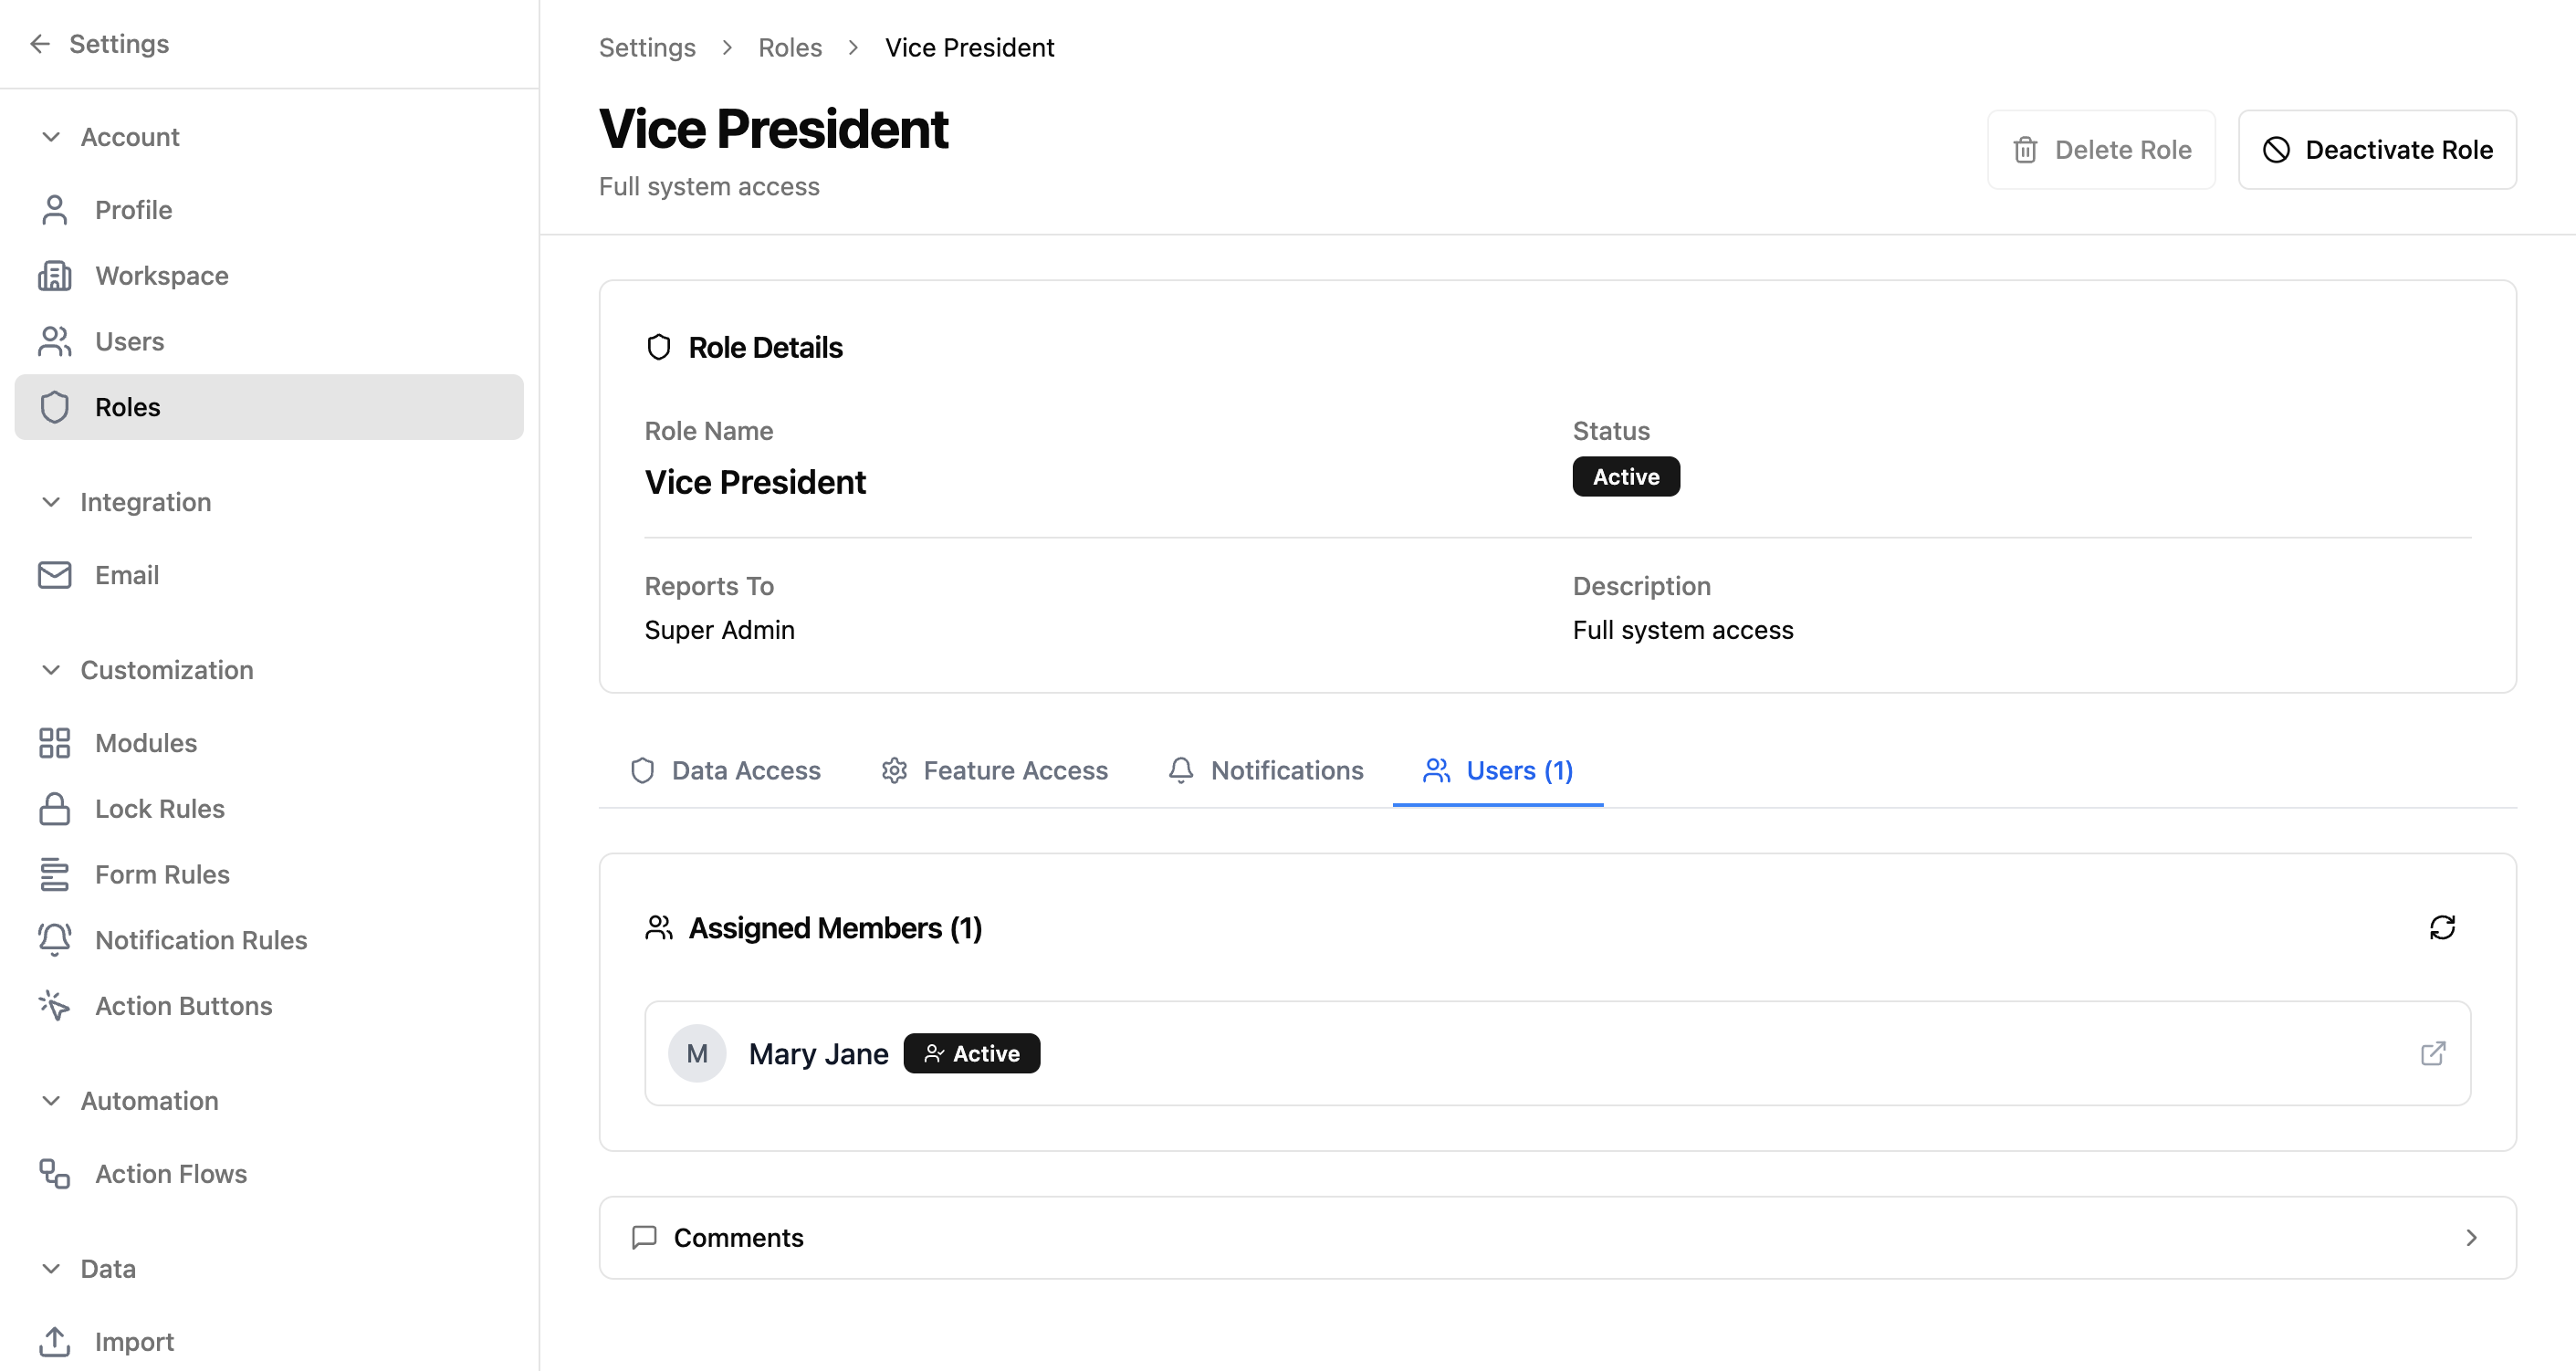
The Users tab shows everyone currently assigned to this role.
What You See
- Header: "Assigned Members (count)" shows the total number of users with this role
- Refresh button: Reload the member list
- Member cards: Each shows an avatar (initials), full name, and status badge
Common Workflows
Add a new team member
- 1Go to Settings → Users
- 2Click "Create User"
- 3Enter their first name, last name, and email
- 4Select the appropriate role from the dropdown
- 5Click "Create User". They'll receive an invitation email.
Change someone's role
- 1Go to Settings → Users
- 2Click on the user's name
- 3Click "Edit User"
- 4Change the Role dropdown to the new role
- 5Click "Save Changes"
Create a new role for your team
- 1Go to Settings → Roles
- 2Hover over the parent role in the tree (e.g., "Sales Director")
- 3Click "Add role"
- 4Name it (e.g., "Sales Representative")
- 5Select an existing role to clone permissions from
- 6Confirm the parent role (Reports To)
- 7Click Create
- 8Open the new role and customize its permissions in the Data Access tab
Restrict what a role can see
- 1Go to Settings → Roles → [Role Name]
- 2In the Data Access tab, uncheck module permissions they shouldn't have
- 3Set field-level security to "Read Only" or "Don't Show" for sensitive fields
- 4Disable peer visibility for modules where they shouldn't see colleagues' records
- 5Save your changes
Control which features a role can access
- 1Go to Settings → Roles → [Role Name]
- 2In the Data Access tab, look for the Feature Permissions section
- 3For each feature group, open the dropdown and select/deselect features
- 4Save your changes