Key Concepts
Before diving into the screens, here's what each term means in plain English.
Lock Rule
An automated rule that prevents editing records when certain conditions are met. Use it to protect finalized records from accidental changes.
Automatic Lock
A lock mode where records are locked automatically based on triggers — like a field value changing to a specific state (e.g., Stage → Closed Won).
Manual Lock
A lock mode where users lock records manually by clicking a button. Useful when locking depends on human judgment rather than field values.
Trigger Type
The event that causes the lock to activate. Options include On Create, On Update, On Create or Update, and On Field Change.
Restricted Actions
The operations that are blocked when a record is locked. You choose which actions to restrict: Edit, Delete, Clone, or Comments.
Exempted Roles
Roles that bypass the lock entirely. Users in these roles can still perform restricted actions on locked records.
Exempted Fields
Specific fields that remain editable even when the record is locked. Useful for fields like notes or status that need ongoing updates.
Lock Rules List
This page shows all lock rules configured in your workspace. Each rule controls when records in a specific module become locked and what actions are restricted.
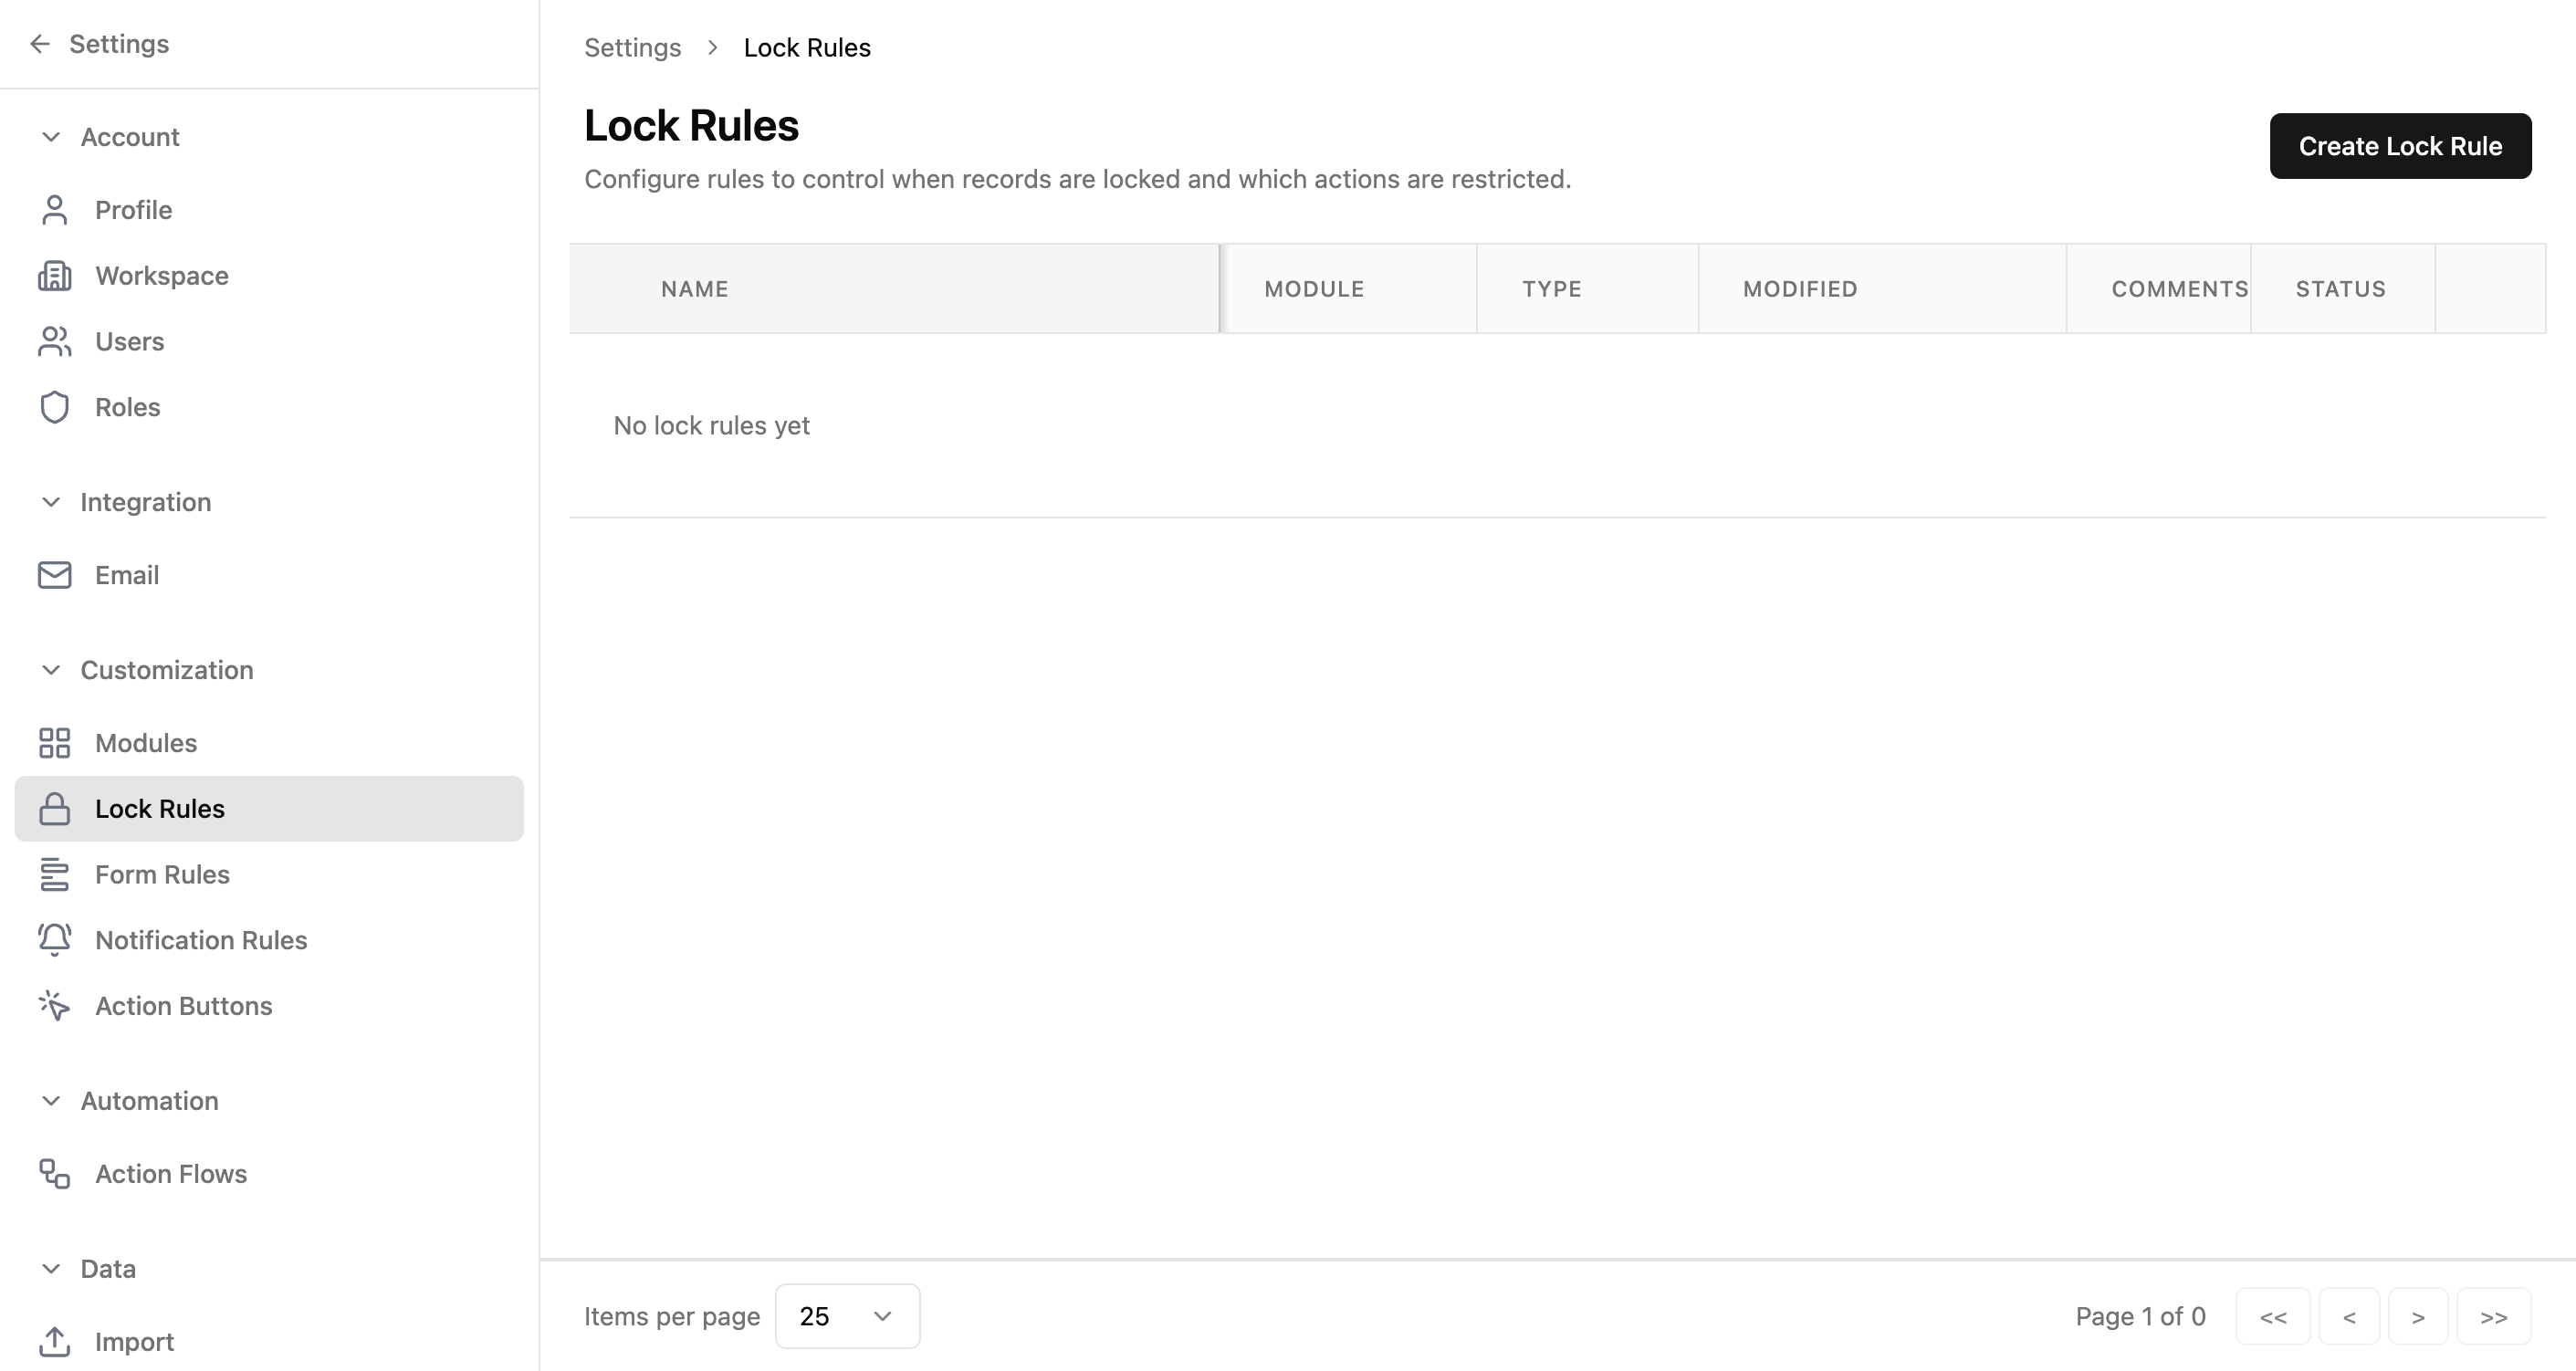
Table Columns
| Column | Description |
|---|---|
| Name | The lock rule's display name. |
| Module | Which module this rule applies to. |
| Type | The lock mode — Automatic or Manual. |
| Modified | When the rule was last updated. |
| Comments | Optional notes about the rule's purpose. |
| Status | Whether the rule is currently active or inactive. |
| Actions | Three-dot menu with Edit and Delete options. |
Available Actions
| Action | How |
|---|---|
| Create a lock rule | Click the "Create Lock Rule" button (top right) |
| Edit a lock rule | Click the three-dot menu → Edit |
| Delete a lock rule | Click the three-dot menu → Delete |
| Enable/disable a rule | Toggle the Status switch in the table row |
Creating a Lock Rule
Click "Create Lock Rule" to open a dialog where you define the rule's basic settings — name, module, lock mode, and trigger type. This is step 1 of a two-step process.
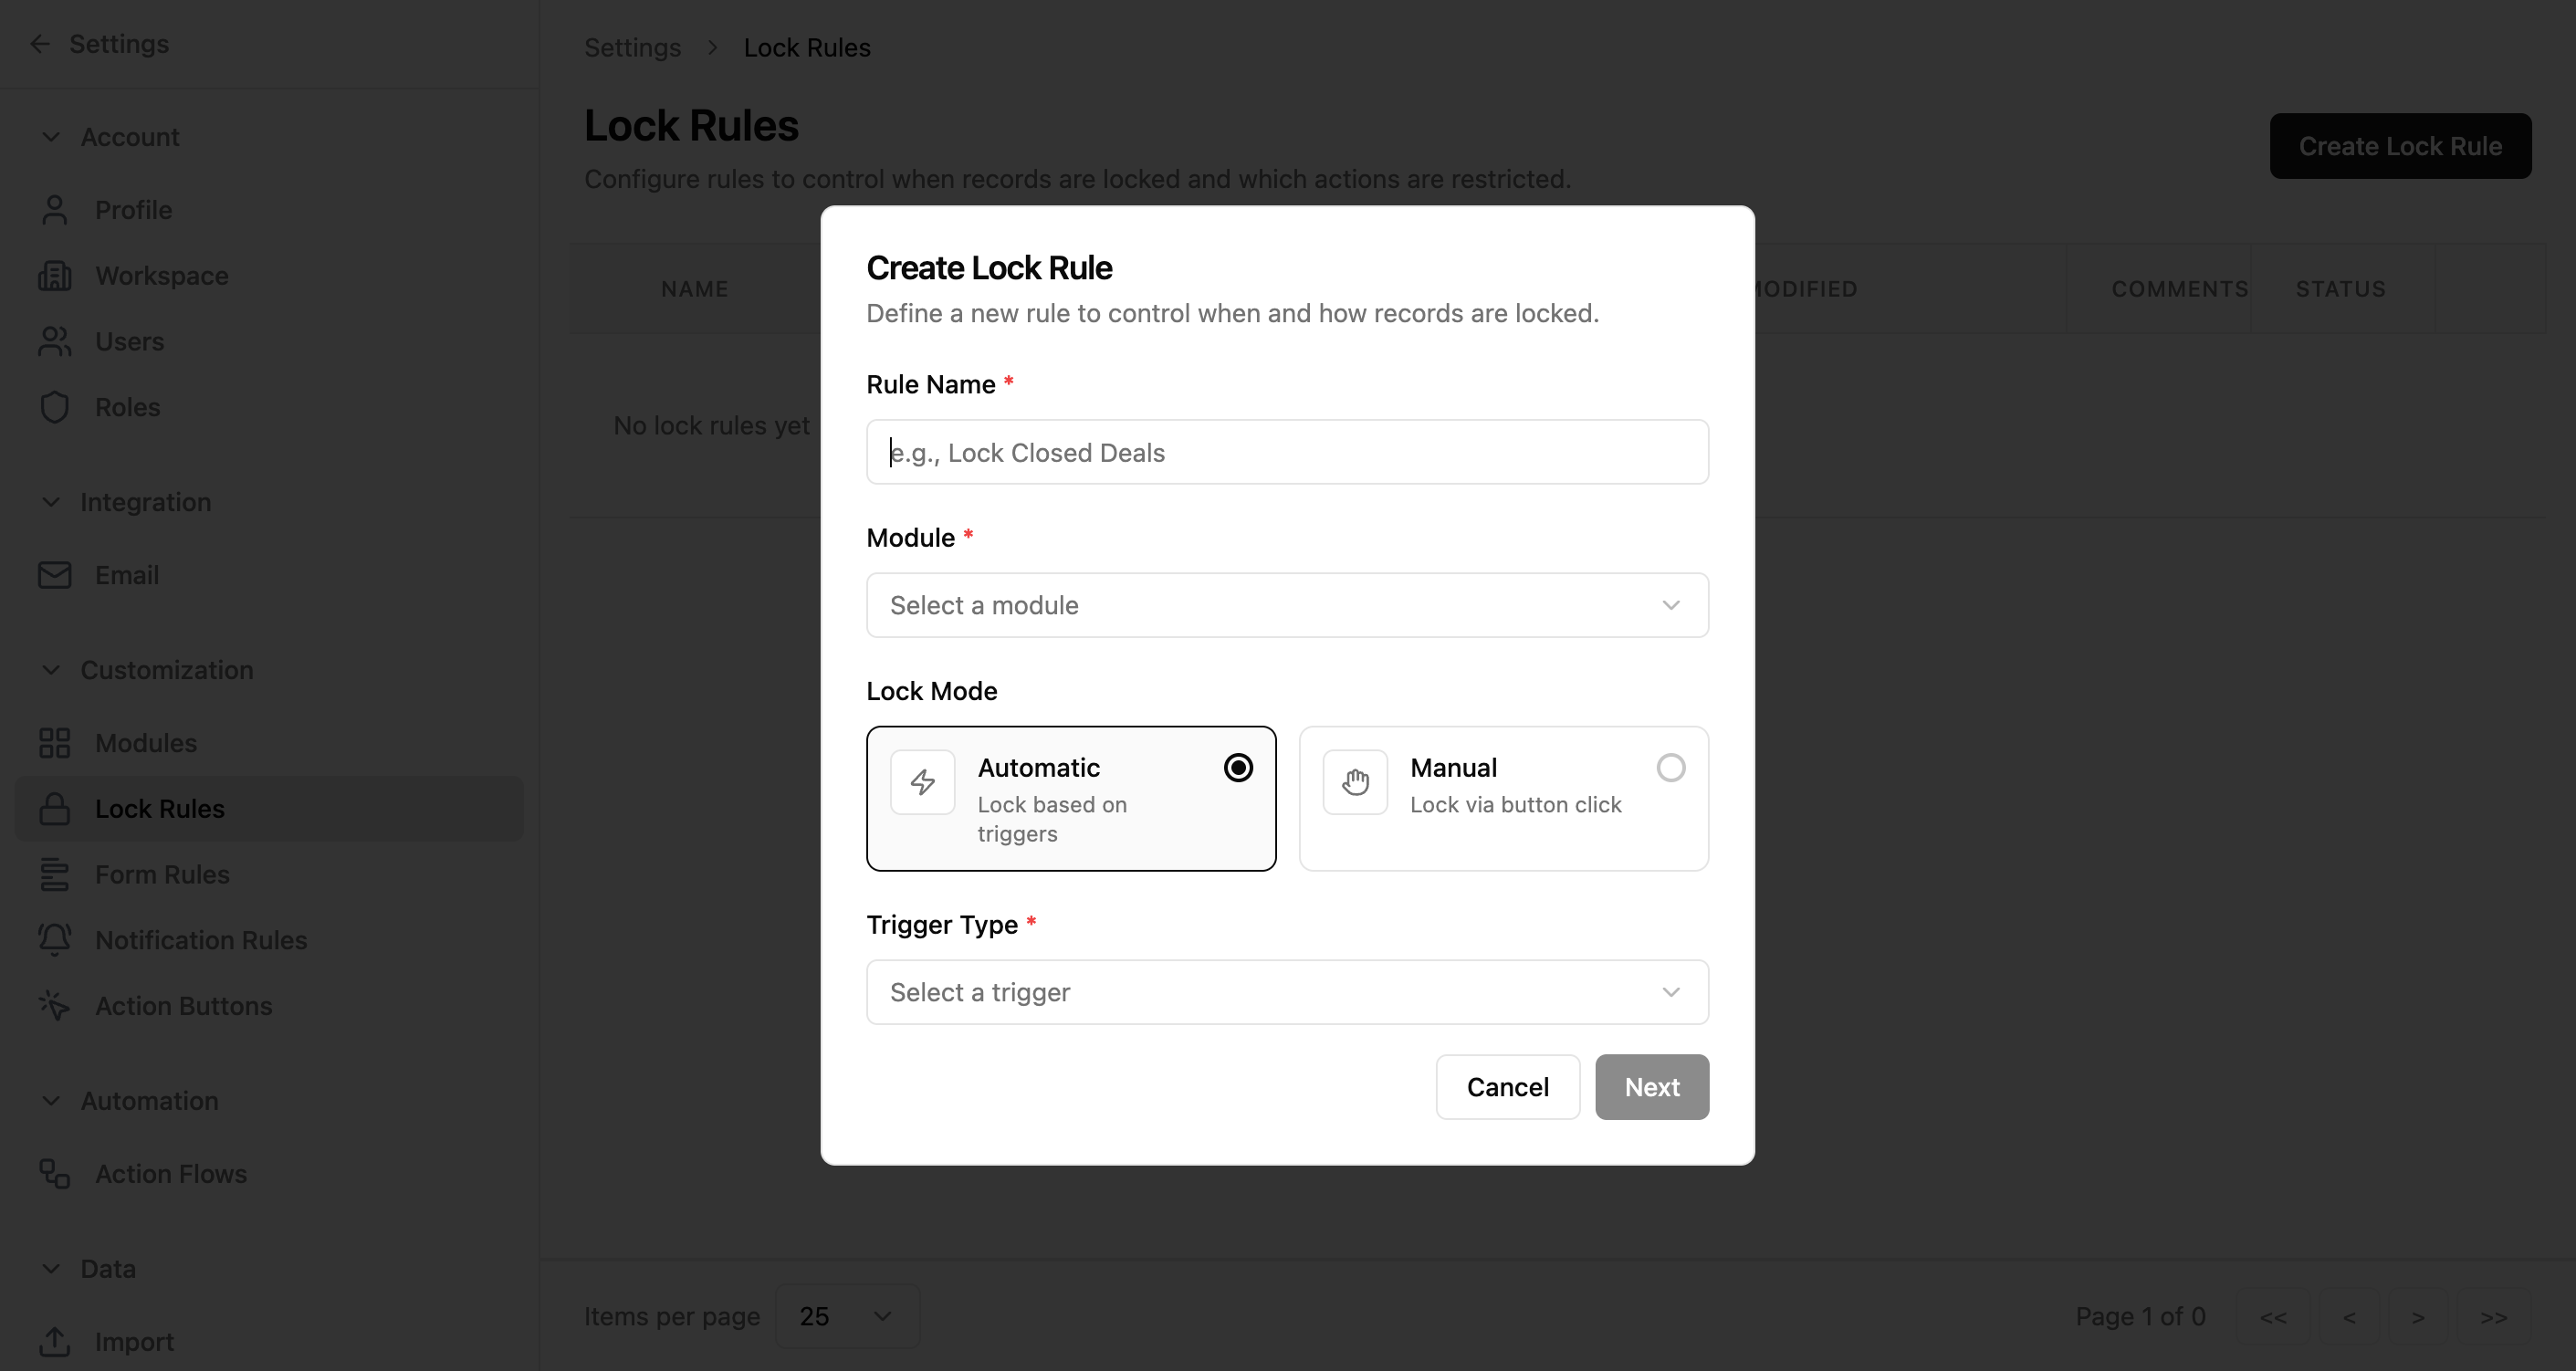
Form Fields
| Field | Required | Description |
|---|---|---|
| Rule Name | <span class="help-badge help-badge-required">Required</span> | A descriptive name for this lock rule (e.g., "Lock Closed Deals"). |
| Module | <span class="help-badge help-badge-required">Required</span> | The module this rule applies to. Options: Lead, Contact, Deal, Account. |
| Lock Mode | <span class="help-badge help-badge-required">Required</span> | How the lock is triggered — Automatic (based on triggers) or Manual (via button click). |
| Trigger Type | <span class="help-badge help-badge-required">Required</span> | The event that activates the lock. Options: On Create, On Update, On Create or Update, On Field Change. |
Lock Mode Options
| Mode | Description |
|---|---|
| Automatic | Lock based on triggers — the record locks automatically when the trigger condition is met. |
| Manual | Lock via button click — users decide when to lock a record by clicking a lock button on the record page. |
Trigger Type Options
| Trigger | When It Fires |
|---|---|
| On Create | Immediately after a new record is created. |
| On Update | Whenever an existing record is updated. |
| On Create or Update | On both record creation and updates. |
| On Field Change | When a specific field changes to a particular value. Opens additional configuration fields. |
Steps
- 1Click "Create Lock Rule" on the Lock Rules page
- 2Enter a descriptive rule name
- 3Select the target module from the dropdown
- 4Choose a lock mode — "Automatic" or "Manual"
- 5Select a trigger type from the dropdown
- 6If you selected "On Field Change", configure the field change details (see next section)
- 7Click "Next" to proceed to the configuration page
️ Tip: The "Next" button stays disabled until all required fields are filled. Make sure you've selected both a lock mode and a trigger type.
Field Change Trigger
When you select "On Field Change" as the trigger type, additional fields appear so you can specify exactly which field change should activate the lock.
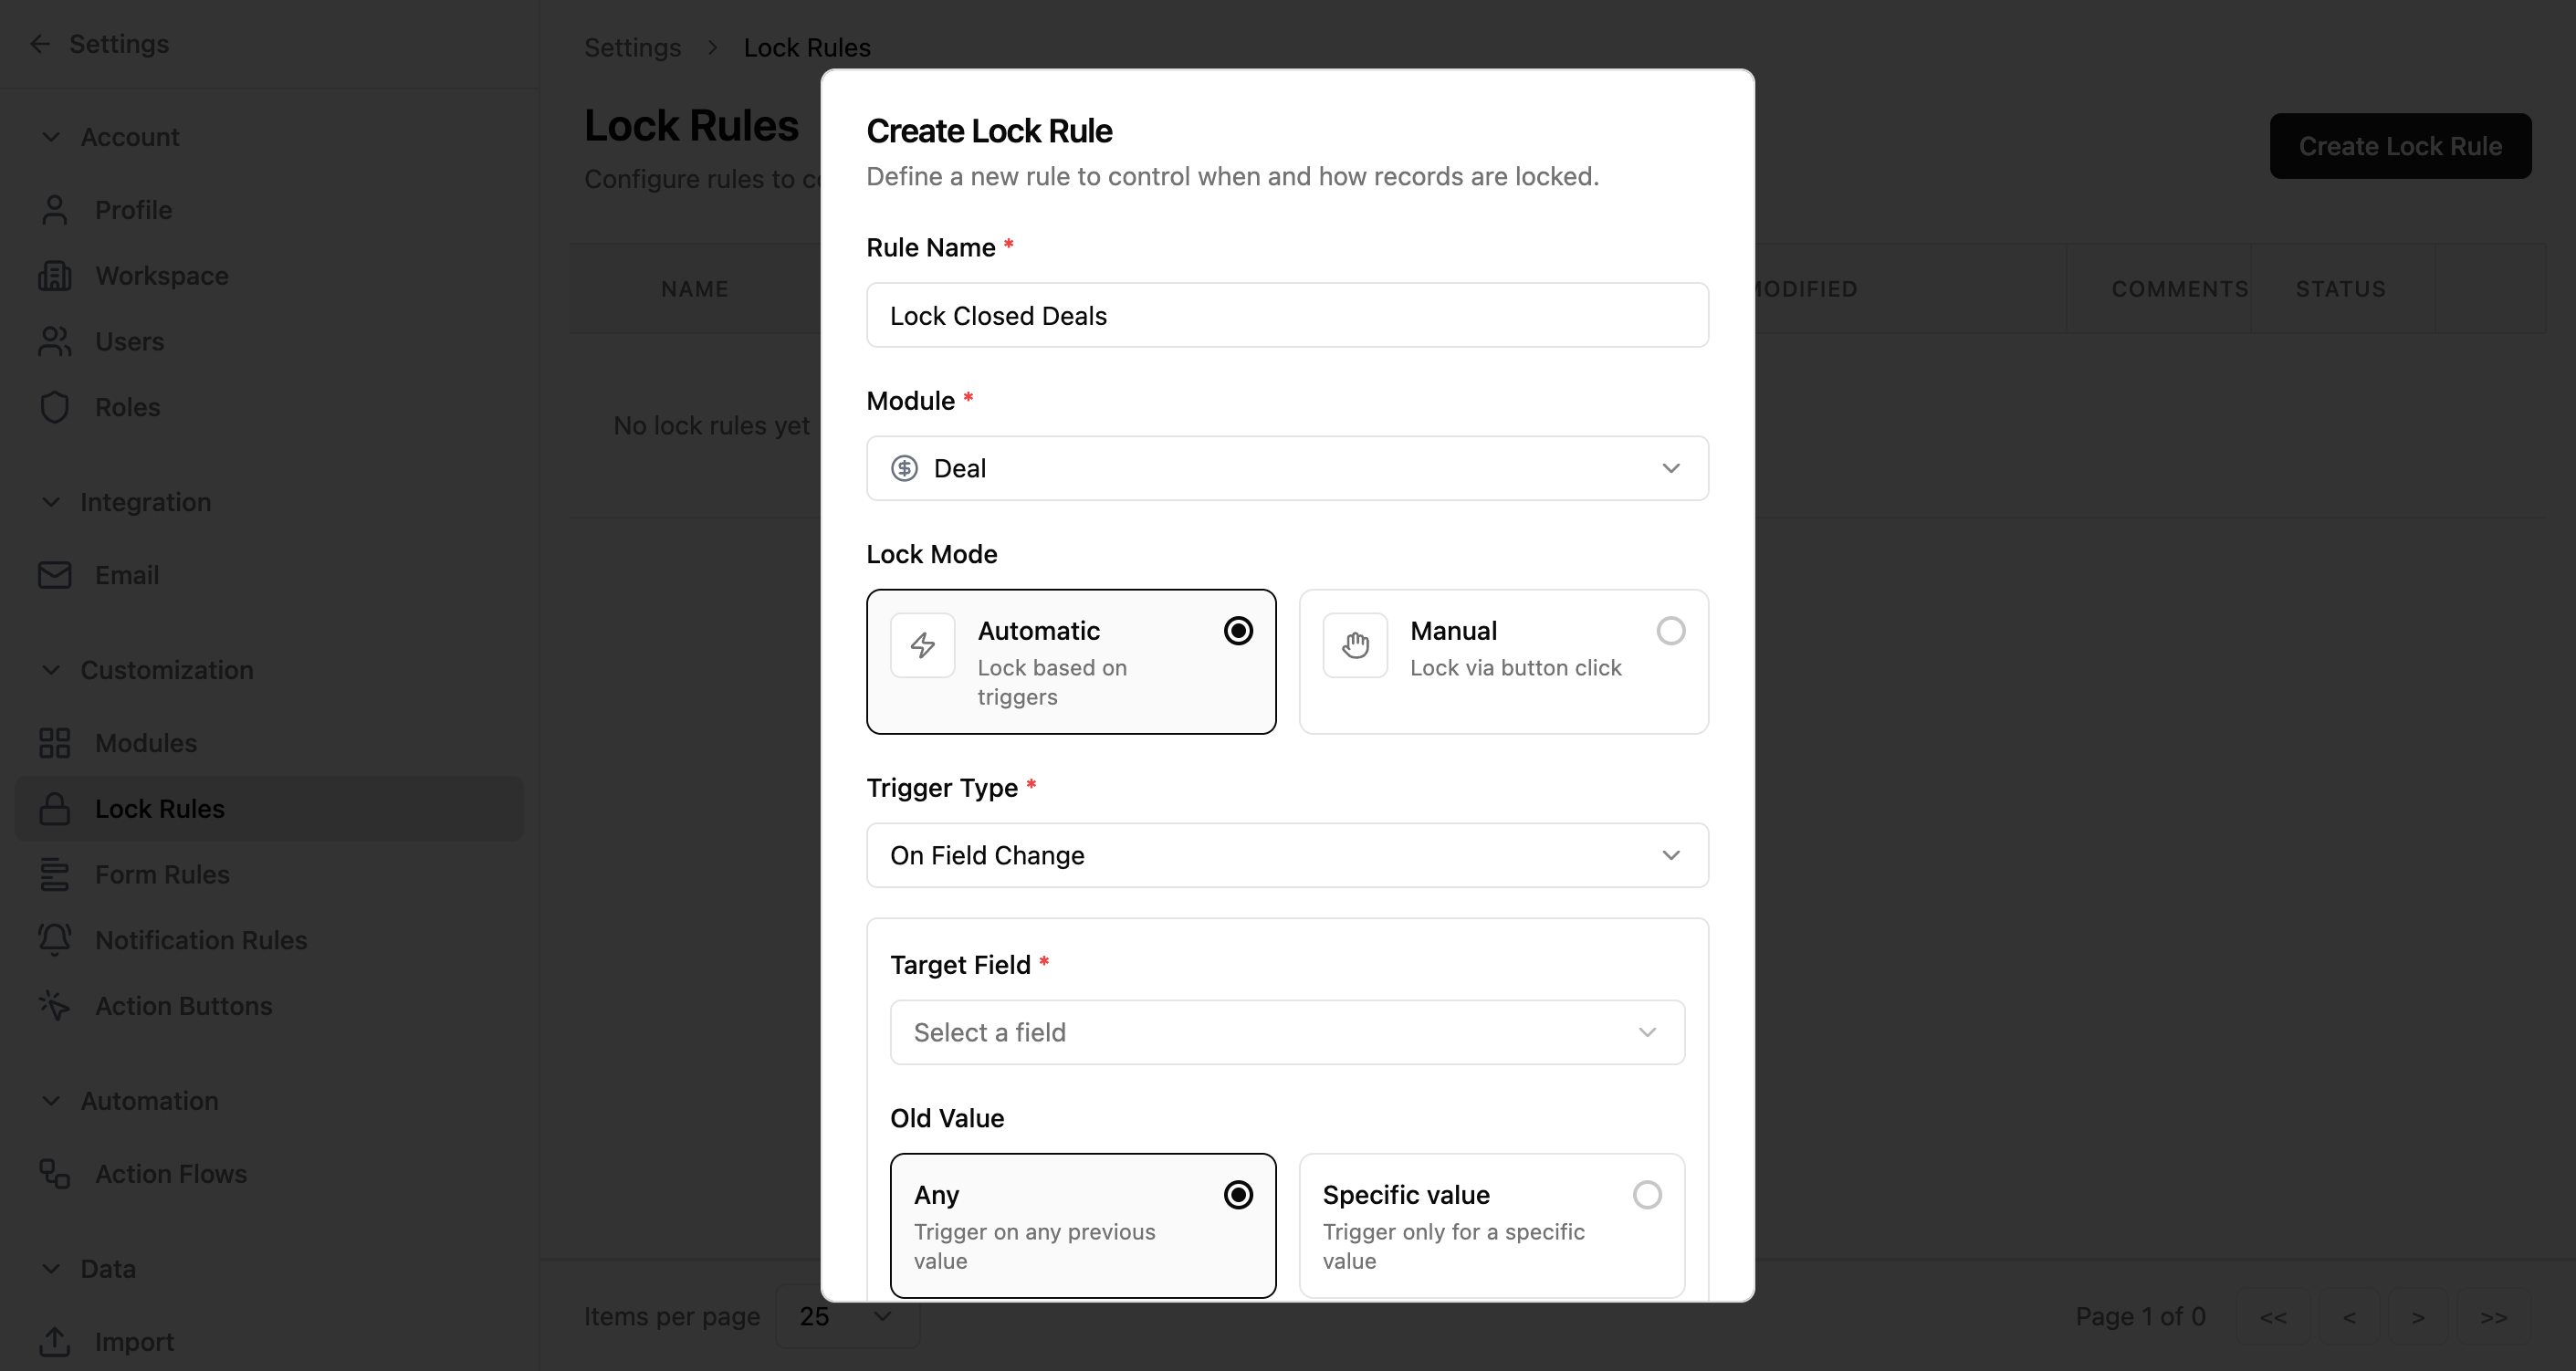
Additional Fields
| Field | Required | Description |
|---|---|---|
| Target Field | <span class="help-badge help-badge-required">Required</span> | The field to monitor for changes. Dropdown shows all fields in the selected module. |
| Old Value | <span class="help-badge help-badge-required">Required</span> | What the field's previous value should be. Choose "Any" to trigger on any previous value, or "Specific value" to match a particular value. |
| New Value | <span class="help-badge help-badge-required">Required</span> | The value the field must change to in order to trigger the lock. For picklist fields, select from a dropdown. For other field types, enter a text value. |
Old Value Options
| Option | Behavior |
|---|---|
| Any | Trigger on any previous value — the lock fires regardless of what the field was before. |
| Specific value | Trigger only for a specific value — the lock fires only when the field changes from this exact value. |
Example
To lock a Deal when its Stage changes to "Closed Won":
- 1Select "On Field Change" as the trigger type
- 2Set Target Field to "Stage"
- 3Set Old Value to "Any" (trigger regardless of previous stage)
- 4Set New Value to "Closed Won"
- 5Click "Next"
️ Tip: Use "Specific value" for the old value when you only want the lock to trigger on a particular transition — for example, only when Stage changes from "Negotiation" to "Closed Won", not from "Qualification" to "Closed Won".
Lock Rule Configuration
After clicking "Next" in the creation dialog, you land on the full configuration page. This is where you fine-tune exactly how the lock behaves — which records it affects, what actions it restricts, and who is exempt.
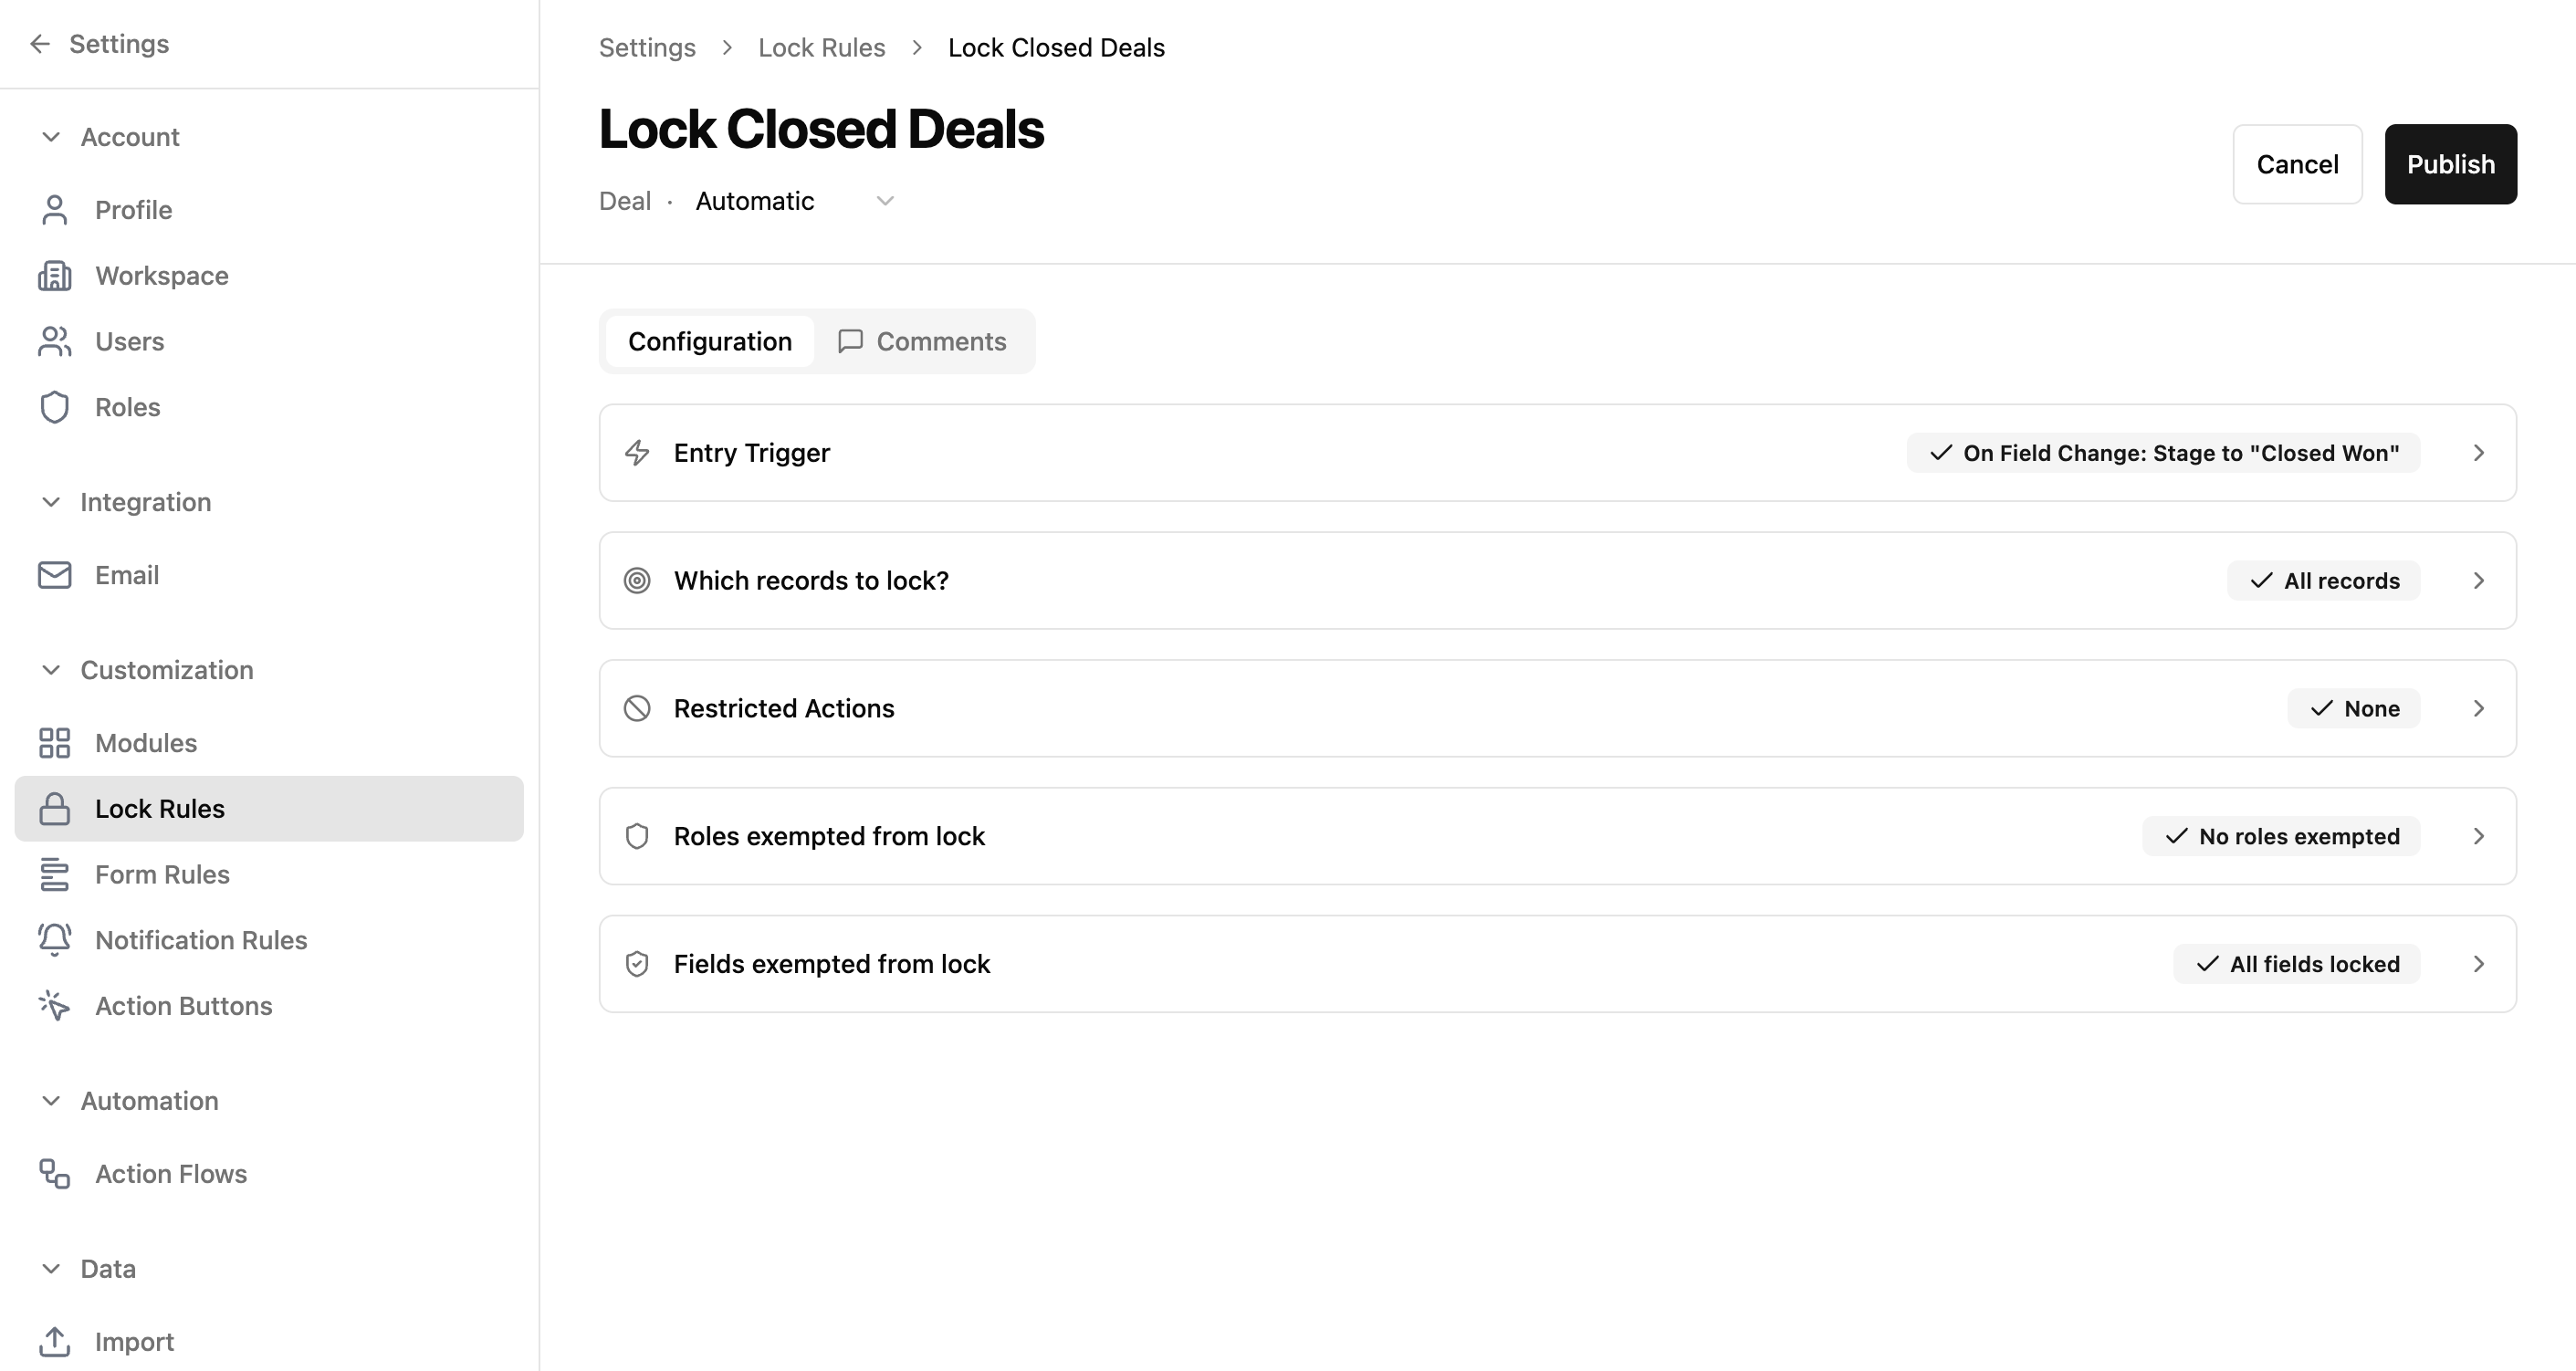
Page Header
| Element | Description |
|---|---|
| Rule Name | Displayed as the page heading. |
| Module Name | Shows which module this rule applies to. |
| Lock Mode | Dropdown to switch between Automatic and Manual. |
| Cancel | Discard changes and return to the Lock Rules list. |
| Publish | Save and activate the lock rule. |
Tabs
| Tab | Purpose |
|---|---|
| Configuration | The main tab with five accordion sections for setting up the rule's behavior. |
| Comments | Add notes or context about why this rule exists and how it should be used. |
Configuration Sections
| Section | What It Controls |
|---|---|
| Entry Trigger | Shows a summary of the trigger you configured in step 1. |
| Which records to lock? | Whether to lock all records or only those matching specific criteria. |
| Restricted Actions | Which operations are blocked on locked records. |
| Roles exempted from lock | Roles that can bypass the lock. |
| Fields exempted from lock | Fields that remain editable even when the record is locked. |
Entry Trigger
Entry Trigger Section
This section displays a read-only summary of the trigger you configured during creation. It shows the trigger type and, for field change triggers, the specific field transition.
Example Summaries
| Trigger Type | Summary Display |
|---|---|
| On Create | "On Create" |
| On Update | "On Update" |
| On Create or Update | "On Create or Update" |
| On Field Change | "On Field Change: Stage to 'Closed Won'" |
️ Note: To change the trigger, you need to delete this rule and create a new one. The trigger cannot be modified after creation.
Which Records to Lock
Which Records to Lock Section
By default, the lock applies to all records that match the trigger. You can narrow it down to only records matching specific criteria.
Options
| Option | Behavior |
|---|---|
| All records | Every record that matches the trigger gets locked. No additional filtering. |
| Records matching criteria | Only records that satisfy additional conditions get locked. Opens a criteria builder where you define field-based filters. |
Use criteria when you want the lock to apply selectively. For example, lock only Deals with an amount greater than $100,000 when they reach "Closed Won".
Restricted Actions
Restricted Actions Section
Choose which operations are blocked when a record is locked. Select one or more actions to restrict.
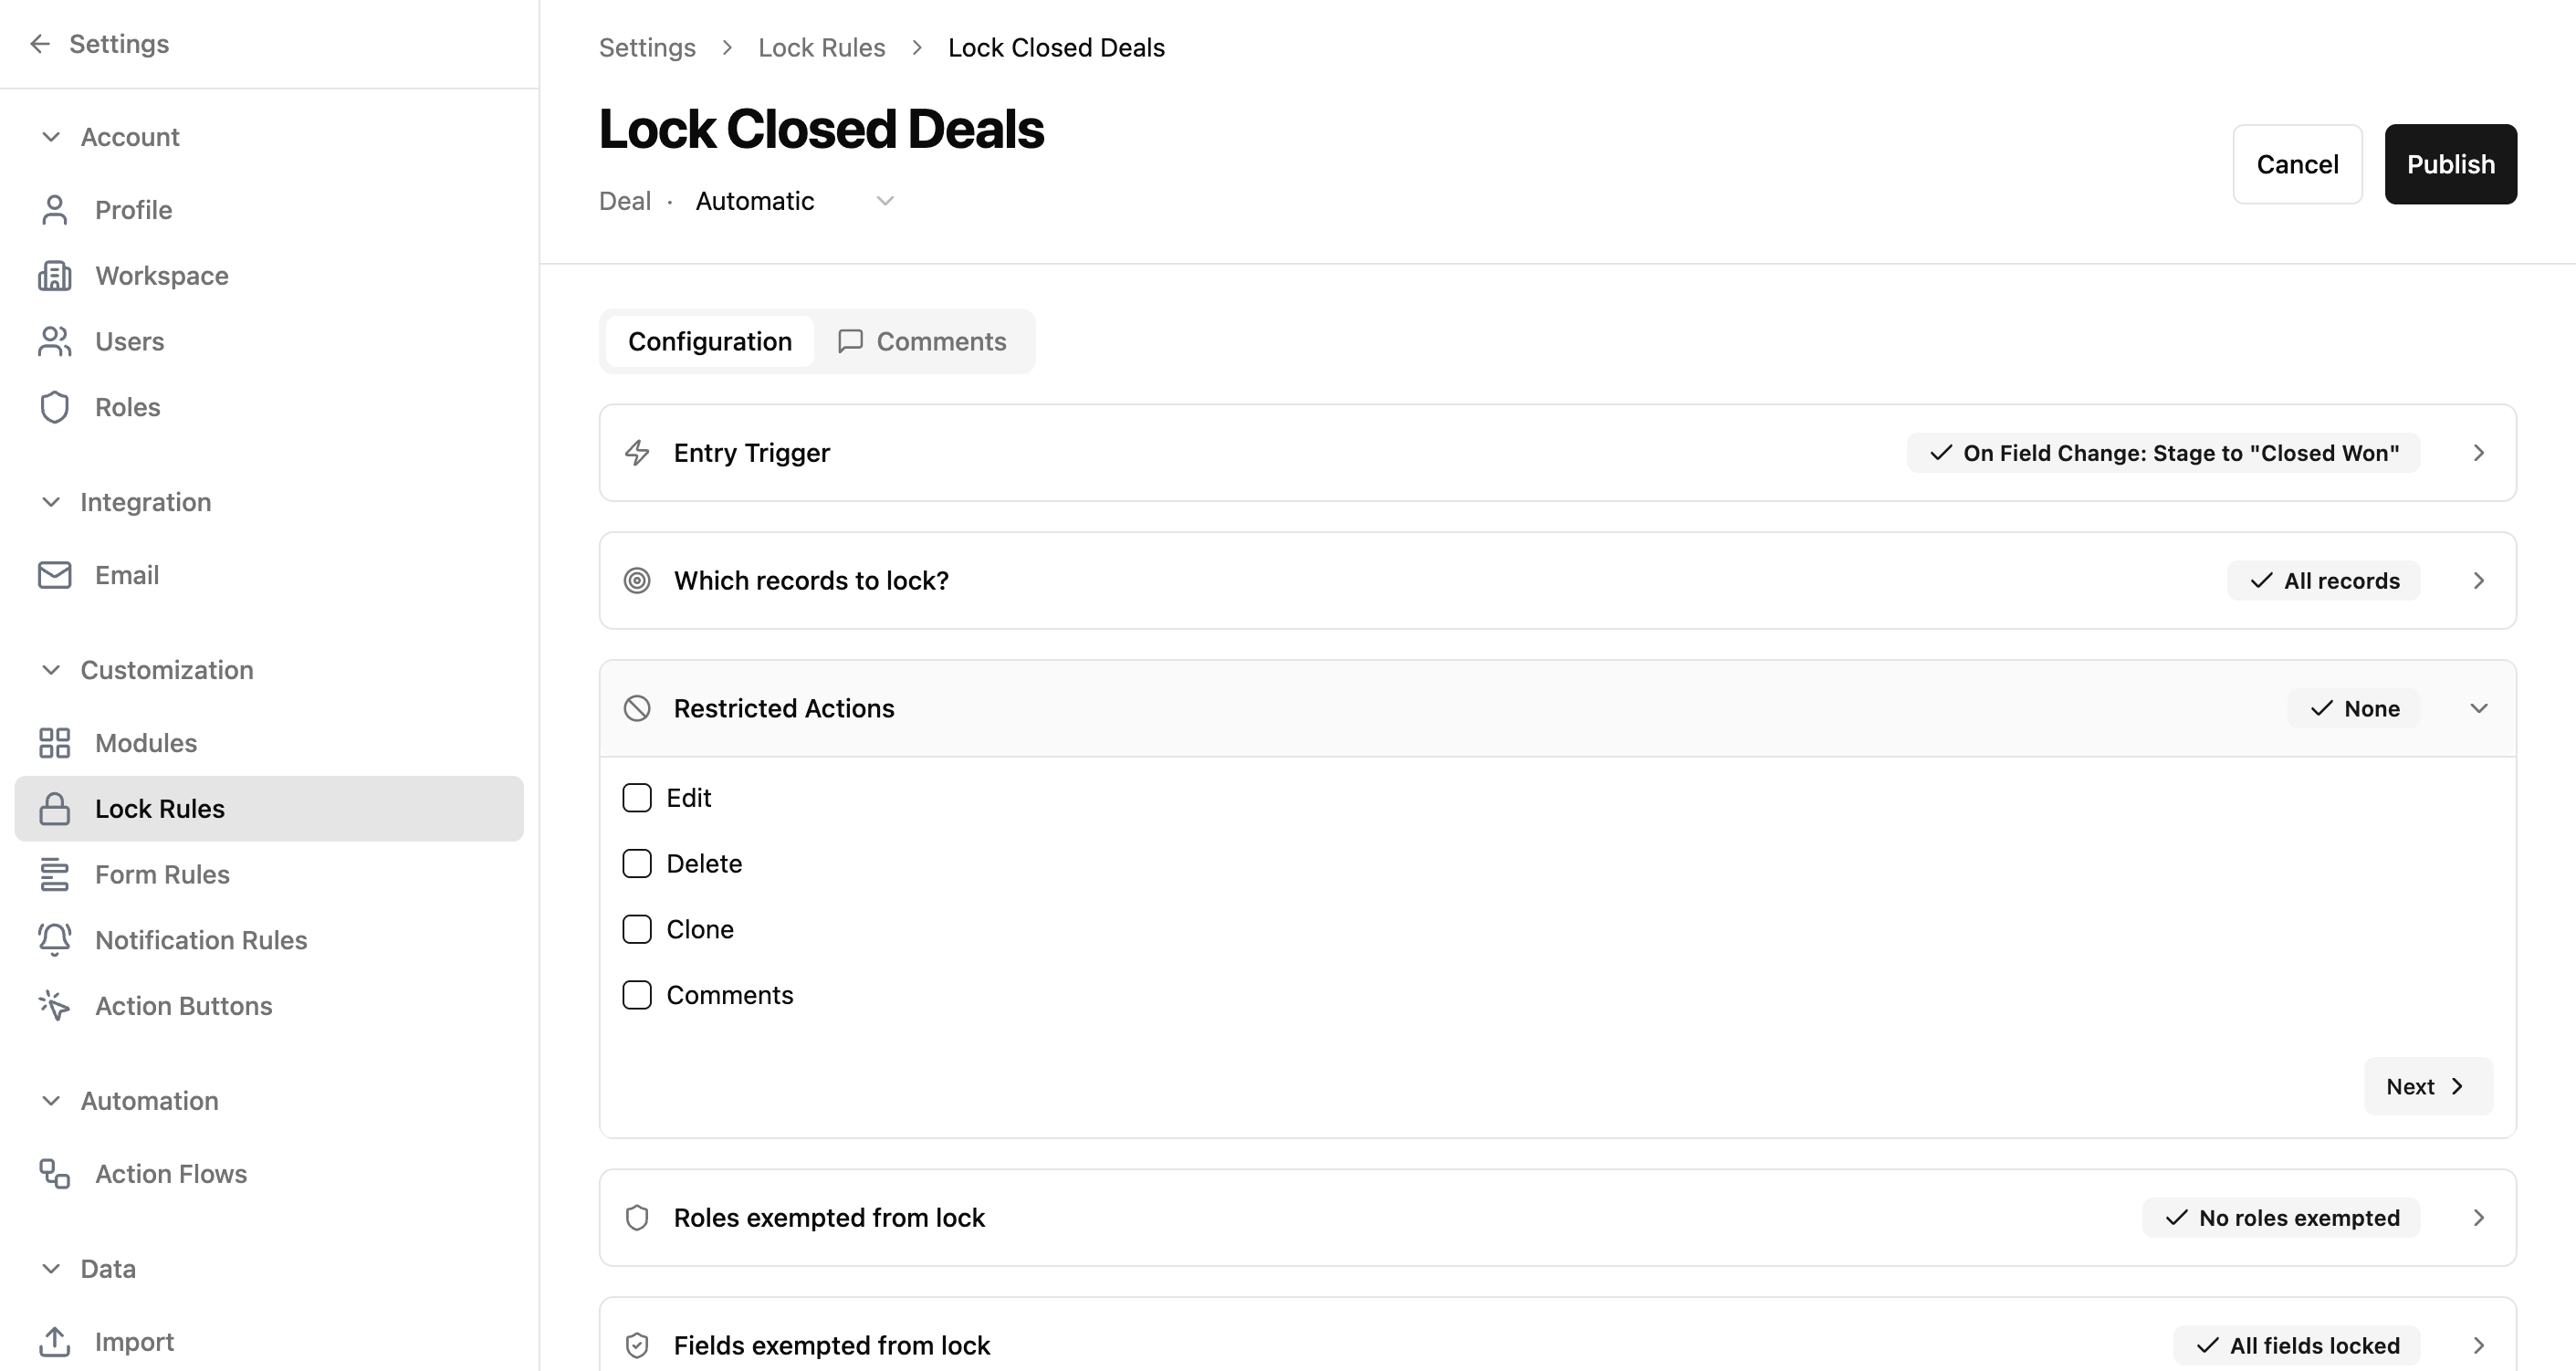
Available Restrictions
| Action | What It Blocks |
|---|---|
| Edit | Prevents modifying any field on the record (except exempted fields). |
| Delete | Prevents deleting the record entirely. |
| Clone | Prevents creating a copy of the record. |
| Comments | Prevents adding new comments or notes to the record. |
️ Important: If you restrict "Edit" but exempt certain fields, those fields remain editable. The exemption overrides the restriction for those specific fields.
Roles Exempted from Lock
Roles Exempted from Lock Section
Select roles that bypass the lock entirely. Users in exempted roles can perform all restricted actions on locked records as if the lock doesn't exist.
How It Works
- Select one or more roles from the dropdown
- Users in those roles can edit, delete, clone, and comment on locked records normally
- Typically used for admin or manager roles that need override access
- If no roles are exempted, the lock applies to everyone
️ Tip: Exempt your Super Admin role to ensure administrators always have full access to locked records for troubleshooting or corrections.
Fields Exempted from Lock
Fields Exempted from Lock Section
Select specific fields that remain editable even when the record is locked. This is useful for fields that need ongoing updates regardless of the record's locked state.
How It Works
- Select one or more fields from the dropdown (shows all fields in the module)
- These fields can still be edited by any user, even when the record is locked
- Only relevant when "Edit" is selected as a restricted action
- Common exemptions: internal notes, priority, tags, or follow-up dates
Use Cases
| Scenario | Exempted Fields |
|---|---|
| Closed deal with ongoing notes | Internal Notes, Follow-up Date |
| Approved invoice with delivery tracking | Delivery Status, Tracking Number |
| Locked lead with priority updates | Priority, Tags |
Publishing a Lock Rule
Once you've configured all sections, click "Publish" to activate the lock rule. Published rules take effect immediately on matching records.
Steps
- 1Review all five configuration sections to ensure they're correct
- 2Optionally add notes in the Comments tab explaining the rule's purpose
- 3Click "Publish" in the page header
- 4The rule becomes active and appears with an "Active" status in the Lock Rules list
- 5Records matching the trigger and criteria are now locked
️ Important: Publishing a lock rule takes effect immediately. Any records that already match the trigger conditions will be locked right away. Test with a narrow criteria first if you're unsure.
Real-World Use Case
Finance team — protecting approved purchase orders
A company's finance team processes purchase orders. Once a PO is approved and sent to the vendor, nobody should be able to change the line items, amounts, or vendor details — but the delivery team still needs to update the Delivery Status and Tracking Number fields.
- 1Create a lock rule named "Lock Approved POs"
- 2Select the Purchase Orders module
- 3Choose Automatic lock mode with trigger "On Field Change"
- 4Set Target Field to "Approval Status", Old Value to "Any", New Value to "Approved"
- 5In Restricted Actions, check Edit and Delete (prevent changes and accidental deletion)
- 6Exempt the Finance Manager role (they can still make corrections if needed)
- 7In Fields exempted from lock, select "Delivery Status", "Tracking Number", and "Internal Notes"
- 8Publish — approved POs are now protected while delivery tracking continues uninterrupted
Adapt this for your team: Lock rules protect finalized records in any workflow. A legal team can lock signed contracts. A healthcare provider can lock submitted insurance claims. An engineering team can lock released product specs. A school can lock published exam results. Wherever a record reaches a "done" state and shouldn't change, a lock rule enforces it automatically.
Common Workflows
Lock deals when they reach Closed Won
- 1Go to Settings → Lock Rules
- 2Click "Create Lock Rule"
- 3Name it "Lock Closed Won Deals"
- 4Select Deal as the module
- 5Choose Automatic lock mode
- 6Set trigger type to "On Field Change"
- 7Set Target Field to "Stage"
- 8Set Old Value to "Any"
- 9Set New Value to "Closed Won"
- 10Click "Next"
- 11In Restricted Actions, check Edit and Delete
- 12Exempt the Super Admin role
- 13Click "Publish"
Allow managers to manually lock sensitive records
- 1Go to Settings → Lock Rules
- 2Click "Create Lock Rule"
- 3Name it "Manual Lock for Accounts"
- 4Select Account as the module
- 5Choose Manual lock mode
- 6Set trigger type to "On Update"
- 7Click "Next"
- 8In Restricted Actions, check Edit, Delete, and Clone
- 9Exempt manager and admin roles
- 10Click "Publish"
Lock records but keep notes editable
- 1Go to Settings → Lock Rules
- 2Click "Create Lock Rule"
- 3Configure the rule name, module, lock mode, and trigger
- 4Click "Next"
- 5In Restricted Actions, check Edit
- 6In Fields exempted from lock, select the notes or comments fields you want to keep editable
- 7Click "Publish"
Disable a lock rule temporarily
- 1Go to Settings → Lock Rules
- 2Find the rule in the table
- 3Toggle the Status switch to inactive
- 4The rule stops applying to records until you re-enable it